3 Essential Components of an Artful Garden Path

An outdoor route comes in one of two categories: 1) a directional instrument to move visitors to a destination as efficiently as possible, or 2) a device which permits people to engage the senses as they meander toward a destination at a leisurely rate.

I talked with landscape architect Sandy Ayers, co-owner of The Garden Route Company, about the nuances of getting the most out of each type of path.

The Garden Route Company

“The three main things to designing a route are ensuring that it leads somewhere, that it remains in character with its surroundings and it’s comfortable to walk,” Ayers says.

Let’s break down this step by step.

The Garden Route Company

1. Make sure the route leads somewhere. A successful route, regardless of what its type, has to have a destination, otherwise it’s just plain useless and pointless. The phrase “wild goose chase” springs to mind.

Aquascape

But that doesn’t mean that the destination needs to be a front door or garage. It can be a calm fountain with a bench or a stone garden. The idea is to provide people a reward at the end of their trip.

The Garden Route Company

2. Keep the trail. Path materials which don’t make sense will sense jarring and confusing. Pick either materials which match an present motif of your house’s outside or garden, or natural features that will blend harmoniously with what’s already in the area.

More on course materials in a bit.

The Garden Route Company

3. Give the trail a proper sense. That really is a twofold issue. If you’re likely to make a stepping-stone route, the stones have to be placed a comfortable distance from each other.

An average space is 36 inches from the center of one rock to the center of the next rock, Ayers says. The gaps between stones should typically be no more than 4 inches. The true distance may differ based on who the route is for: A tall, athletic individual, for example, will likely have another stride length compared to someone more petite.

The Garden Route Company

The issue of relaxation is stability. You simply can’t ask people to walk onto a stepping-stone route that’s wobbling. It’s disconcerting and potentially harmful.

Lou Penning Landscapes Inc..

Ayers suggests that stepping stones be at least 18 by 24 inches big and 11/2 inches thick. “The generous surface measurements will boost stability because of the stones’ consequent shape and weight, while the thickness will keep the step from splitting,” she states. “Place the stones on a level foundation of sand, mortar or pea gravel for best outcomes.”

The Garden Route Company

If you’re creating a route from decomposed granite, then place the trail at a greater altitude (11/2 inches or so) compared to the surrounding land so water doesn’t puddle.

The Garden Route Company

Materials

Paths can be made from wood, concrete, brick, decomposed granite, flagstone or any other substance that feels good to walk, offers a grip when wet and will not wash off.

The Garden Route Company

If you’re going with a stepping-stone route, use the gaps between the steps as another opportunity to add attractiveness. For dwelling joints Ayers likes to use creeping ground covers like elfin thyme, dymondia and infant tears. “Recess the plants under the top of the stone with at least a half inch,” Ayers says. That will keep the stones visible, preventing trips.

Cosmetic Dentistry

Gaps, or joints, can also be filled with granite countertops, concrete, another type of rock than the step, river stones, pebbles, gravel, beach glass or marbles.

The Garden Route Company

Setting the Pace

The type of path you choose will set the pace for how fast or gradually someone will get to the intended destination. If you’re trying to get guests into the front door, then a straight route makes the best sense. “An entry route is at least 5 ft wide in order that two people can walk side by side comfortably,” says Ayers.

Jan Enright Creations

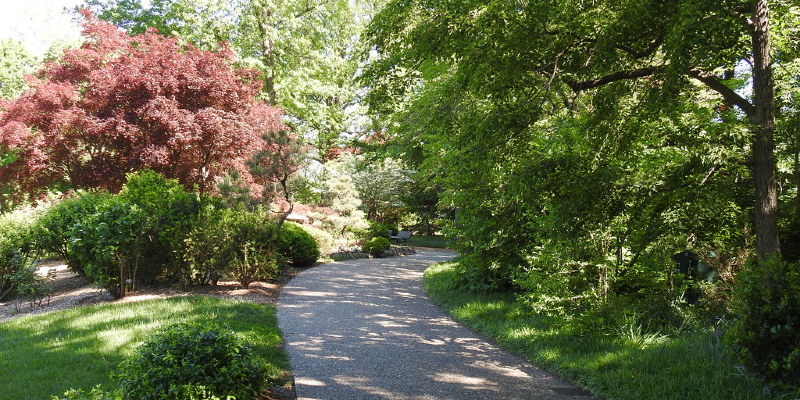
A meandering garden path, however, can be much narrower, as the aim is for guests to follow it to discover what lies ahead. “If you need someone to linger,” says Ayers, “curve the trail about focal points, like a tree, boulder or berm of property. The engaging paths curve around points of curiosity rather than arbitrarily twist and turn.”

Paces Construction Co

Plant Layout

Despite a path’s destination, make the journey a visually appealing one with many different features.

Which features you choose depends on how long you would like to catch someone’s attention. “For a straight, wide path that leads to a front door or doorway,” Ayers says, “I’d provide a single species of flora, like grasses. This way they can appreciate it while walking directly right through. On the other hand, a meandering path might get a large variety of species to maintain somebody’s attention”

Dane Spencer Landscape Architecture

Your turn: We would really like to find a landscape route you have created. Please discuss a photograph from the Remarks below!

More photographs: Read thousands of inspirational path designs

See related

After a Cluttered Closet, Now a Creative Workspace

I built a “cloffice” — an office in a cupboard. Cloffices are done many times before, and I chose to put my own spin on one.

This cloffice was for my 10-year-old daughter’s bedroom, a workspace for her. She’s a bit of a tomboy with a total of four or three items that require hanging. We have tons of other closets in our home, including a sizable walk-in cupboard in our guest room. And next to her cupboard is an integrated cabinet that can hold whatever clothes will need to hang. Her chamber also has a wall unit with eight shelves and eight drawers, as well as a sizable underbed drawer. Lots of storage all around.

When she had been a very girly girl, I may not have decided to go this course. I’m a firm believer, though, in making you home work for you. My children’s cabinets tend to be such lifeless spaces filled with mess that I don’t have any issue with using them for other things that better match their requirements. In this case shifting my daughter’s desk to the cupboard opened her entire room.

The new workspace has really helped her room remain neater than previously. Here’s how it was made by us.

Before Photo

Christina Katos

Christina Katos

The project started out with a normal bedroom cupboard having a double sliding door. We tested out the cloffice concept for a couple weeks with a classic desk to see if it’d do the job. My daughter was pleased with the installation and loved the space that her chamber gained.

I gutted, painted, installed lighting, place in shelves, built a desk and made an organized and fun space for the 10-year-old daughter.

Christina Katos

Christina Katos

I included interesting accessories to maintain craft materials and add personality. Any of these items will be simple to alter as she develops and her tastes change. In the meantime there is plenty of storage to help keep my youthful daughter organized for years.

Christina Katos

We wanted a space for homework, creating, reading and having fun. There would be storage shelves, bins for markers and pencils, and a good deal of desk space.

Christina Katos

Once the cupboard was empty I began by removing the doors, cabinet and shelf rod. (If you worry about resale, then just save these bits to place back) My preferred cleaning crew came in to see mother wielding a crowbar and then pick up the wreck. Be sure that you get all the nails and screws right away if you are doing something similar to this in a kid’s bedroom.

Christina Katos

I then painted the entire cupboard, ceiling comprised, with two layers of Rust-Oleum chalkboard paint. After the paint was dry, I treated the walls to set the chalkboard paint. It’s done by rubbing on the side of a piece of scatter all over the paint and allow it sit for a day. I then rubbed it with a chalkboard eraser and let that sit for a day as well. Then I wiped it all down with a wet cloth.

Christina Katos

The cupboard is 76 inches wide and 20 inches deep. I had enough room to bring a 65-inch-wide desk as well as an Ikea Billy shelving unit on the side. The unit, turned sideways, is not visible from outside the cupboard. A 4-inch gap in the face of the shelving unit into the back wall is perfect for larger items such as board games.

Christina Katos

Next I added an Ikea Fintorp wall storage method. The railing is 221/2 inches wide and contains three caddies for pens, chalk and markers. Extra hooks hold scissors and other tools.

I centered the railing with the introduction of the cupboard. The chalkboard finish came in handy for marking off the studs, which supplied a good spot for procuring the railing to the wall.

Christina Katos

Next came floating shelves and two of Ikea’s Astrid light fixtures that were light. They are plug-in lamps that turn on with a pull button.

I purchased poplar plywood, cut me by fine gentlemen in Home Depot, to serve as a desktop computer. After ensuring it match perfectly, I sanded the edges and gave it one coat of primer and two coats of Benjamin Moore semigloss paint. I primed the entire piece of wood but painted just the top, bottom and front edge, because those are the only sections of the background that would be visible.

Christina Katos

I attached the background with four cleats — strips of wood used to fortify a surface and support items like shelves and desktops. In this case I screwed the cleats to the studs to support the desktop and provide it the floating appearance I was searching for. I made sure to leave room between cleats so that the wires in the wall-mounted lamps could hang back down.

I measured so that the top of the desk was 30 inches away from the ground. Additionally, I made sure it lined up with a few of the shelves in the storage unit. I attached the cleats into the studs and added L-brackets for extra support. I then attached the background with screws underneath.

(Because the bookcase is around the left side of the desk, the background does not reach all of the way into the left wall, so I was not able to put a cleat there. I place a small cleat supporting the door frame instead. It is not visible in the front of the desk and also secures the front-left corner)

Christina Katos

Here’s a shot from beneath the desk, showing how the background attaches to the cleat.

Christina Katos

I added a piece of poplar into the front of the desk with mounts also. It had been hauled into the desk from underneath and helps you to keep the middle of the desk from sagging. It fits perfectly between the front of the desk and the door frame, providing the whole background a more finished appearance.

Christina Katos

We inserted a hole for cords to operate into a surge protector under the desk. My 10-year-old isn’t using an iPad, cell phone or notebook now, but she’ll be later on.

Christina Katos

Christina Katos

Once the desk was I was able to address the issue with wall-mounted light fixtures: the telltale wires running down the wall. I had a way to make them vanish. I bought a cord hider having a glue backing in my hardware store. The plastic D-shaped tube is hollow in the centre with room for one cable. I cut mine into the desired lengths for both cords and coated it with two layers of chalkboard paint to blend in with the wall. Once the strand covers were sterile, I peeled off the backing and stuck them into the wall.

Christina Katos

Using cable tacks I then ran the wires beneath the background and attached them to the cleats on the wall. Cable tacks are similar to large staples with a rounded top to securely hold cords down. They are the perfect way to keep your cords hidden over a baseboard or tacked into a piece of furniture. Both cords in the lamps operate beneath the desk and match up with the surge protector.

Christina Katos

The finished cupboard! The steps weren’t overly involved but were time consuming. The outcome is a unique and fun space that is is a hit with my 10-year-old and would do the job for an adult also.

Christina Katos

The bedroom is filled with shelving and drawers. A massive wall unit occupies one whole wall and makes up for the cupboard loss.

Christina Katos

Christina Katos

This built-in cupboard fits her few hanging items. (I included the closet rod.) The cabinet appears small from the outside but really reaches into the ceiling interior.

Your turn: please reveal your creative home office!

More clever closet-sized workspaces

See related

The Way to Look Good From Any Angle (the Garden Edition)

Many professional versions are photographed from one angle, their best side. A truly beautiful model, however, will look great from any angle. Similarly, a number of our gardens were created, usually unintentionally, to look good from one vantage point. If it’s a front lawn, that vantage point is traditionally the street. If it’s a backyard, that spot is most likely the back door, patio or deck. We all have spots in our gardens that leave us less than satisfied, needing more. At some stage it’s time for a makeover.

Many years back I got a question from a homeowner having an undeveloped backyard that sloped radically toward the lake. The challenging thing about this project was that the backyard was seen from a number of different angles. There were just two loggias, one on the first floor and one on the second, and a view toward the home from the lake, and ultimately, a view from a sidewalk. Then there were the bull.

How was I to process all of this to a gorgeous, cohesive strategy? Perhaps your space is not this complicated but you know deep within that you have not yet tapped to its full potential. Here’s help in creating a garden area that looks good from any angle.

Huettl Landscape Architecture

Vary the heights. Engaging a dominant third dimension in your garden is a good way to add interest. Notice the heights of the planar surfaces here. This garden would shed much of its interest if all of the surfaces were on the exact same degree. It is strong enough today to command attention when seen from any angle.

D-CRAIN Design and Construction

Let’s think about this remarkable three-dimensional courtyard. The varying heights of the Cor-Ten steel planters add immeasurable interest. The reduced wooden decking, juxtaposed with the steel, provides continuity in color when adding textural interest. The upright sort of the succulents mimics the support beams on the home.

Gregory Lombardi Design

Add artwork. Another way to add multilevel interest would be to use appropriate artwork. This stone medallion is a centerpiece that looks great from any angle. If you are thinking about sculpture, make sure that its form and dimensions make a statement from every vantage point. A tall, thin sculpture, for example, would most likely look underscale and improper seen from above.

Adam Woodruff + Associates, Garden Artisans

Plant en masse. Now that we’ve discussed hardscaping, let us proceed to planting approaches. Mass plantings of the exact same or similar crops will most certainly have a positive influence in your garden when seen from above or at ground level.

Notice the gorgeous number of clumping and upright plants at the prairie-style garden here. An incredible amount of interest is produced on account of the appropriate and artistic usage of texture, shape and color. The serpentine hardscaping lines make a daring yet relaxing statement from ground level and would take on an artistic flair if seen from above.

PC Landscape Architects & Associates, Clinton

Mix textures and materials. The plan of the garden is relaxing and constant whilst including a variety of decorative grasses and Russian sage (Perovskia atriplicifolia, zones 4 to 9). The similarity of form and wide range of substance create cohesion and interest. With its serpentine bed lines, the garden pulls the eye through the space from every angle.

Arterra Landscape Architects

3 Garden Case Studies

1. The boardwalk that is metropolitan.
This urban backyard is stuffed with interest from every viewpoint. Running the boardwalk at a diagonal to the fence has created unexpected interest that brings the attention and engages the viewer.

Arterra Landscape Architects

The identical garden is arguably much more interesting at ground level. The boardwalk brings the eye through the space, enticing the viewer to experience each vista. The mass plantings of blossoms from side to side bring much-needed softness and goodwill to this contemporary garden. The planar surfaces create the illusion of spaciousness.

Jay Sifford Garden Design

2. The woodland path. I live on a really wooded lot, together with front yard receiving the majority of the sunlight. My deck wraps around the front of my property, so this garden space is seen from the street, the lawn back toward the street and looking down from the deck.

I wanted a usable front lawn, so I made a serpentine, wider-than-normal pathway to a stacked-stone seating wall. Strong route lines define both the space and its own purpose. Because this garden was a clearing in the forest, I made the trail very wide; this damaging space allowed me to overflow the beds without making the space seem or feel overly busy. A narrower route would have felt immortal. Since the garden is casual by layout, I utilized repurposed railroad ties and gravel to split out terraces to provide the guest places to linger and revel in the space.

Repetition is a really useful concept to help a space sense homogenous and familiar. Here I used Japanese maples and chartreuse foliage across the pathway to create continuity.

Jay Sifford Garden Design

This second view is looking from the seating wall back toward the street. The challenge here would be to conceal views of the street and neighboring homes, since I wanted to get a level of solitude.

As I planted my trees and larger shrubs, I made sure they were just placed to conceal as lots of the undesirable viewpoints as possible. When siting trees and trees, always look at them from multiple viewpoints. Occasionally moving a plant 6 inches can make an immeasurable difference in the overall sense of a garden.

Jay Sifford Garden Design

The next view is looking down from the deck. Prominent lines specify the space, carving out a bold presence in the midst of the forest. With no lines that are notable, the space would uneventfully fade to the woodlands. Pops of chartreuse accentuate the space and cross over the path, whilst burgundy and blue foliage both stand up to the chartreuse and calm down it just enough.

Jeffrey Gordon Smith Landscape Architecture

3. The rill. Strongly defined lines provide the interest that brings the eye toward the focal point. Notice how the urn in the middle of the water feature mirrors the color and shape of the flagstone. By supplying this continuity, the designer has created an informal yet organized area.

Jeffrey Gordon Smith Landscape Architecture

This garden works just as well from ground level, providing continuity from one garden room to another. The color of the hardscaping and the flow of water from a focal point to some other guarantee a relaxing garden experience.

See related

13 Ways to Keep the Peace With Roommates

Sharing space with roommates can be challenging in the best of times — and that isn’t mentioning the other times. You know, the instances your roomie requires your food without requesting (or replacing it), leaves a huge mess for others (you) to clean up, or attracts a significant other home to stay for weeks (or months).

With a new school year here, and a lot of individuals moving into new flats with fresh roommates and good goals, let’s get a couple things straight about roommate etiquette — and save a great deal of headaches down the road.

Better: Pass this along to your roommates, so that you can all start off on exactly the same page.

Sealy Design Inc..

Be social. You certainly don’t need to do everything together or become the very best of friends — but hiding out in your room constantly and decreasing every time that your roommates invite you to do some thing sends a negative message.

Component of what could make living with roommates pleasure is hanging out together. Likewise, do not form a clique and exclude a different roommate from actions. If a roommate situation isn’t working outside, address it directly.

Corynne Pless

Chat decorating area. That means that you need to all get equal wall space (if you need it) to hang art in common areas, and you should work together to decide on furniture arrangements and accessories. To each his or her own in bedrooms, however shared space actually should be shared.

When you move in, it can be a fun bonding experience to undertake a household project together. Reach the local flea market together, paint a bit of furniture, or collaborate on a artwork wall.

A Gallery Wall for Every Personality

Maggie Stephens Interiors

Keep common areas clean. Maintain your own personal items from taking up permanent residence in common areas. The living room shouldn’t be a dumping ground for heaps of unfolded laundry, teetering stacks of magazines, or crusty cereal dishes!

Whenever you are finished with something, put it back. Just because your roommate seems to always leave her things laying around doesn’t mean that you should, also. Especially in households with a couple of roommates, messiness is a slippery slope. Set a good example, and it’s more likely your roommates will follow suit.

Betty’s Room, LLC

Look after your own pets. If you’ve got a pet, do not expect your roommates to help care for this. Even if they had been excited to have a furry friend in the house, it isn’t their obligation to perform the dirty work.

If you would like to request your roommates to take care of your furry friend when you are away on a trip, inquire first (do not assume they’ll do it) And offer to pay them or treat them the next time you go out. If it’s your roommate who has the pet, it is fair to expect them to take care of daily pet duties — and offer a pet fur-removing brush for your couch.

Madison Modern Home

Do your own dishes. This has become the most common roommate complaint of all time — do not allow it to be around you! Do your own dishes immediately after meals, and if your roommate cooked dinner for the two of you, get in there and wash up after. When handling roommates who do not wash their dishes, try speaking with them straight first, aiming for a tone that is firm but not angry.

In an extreme instance of dish-neglect, try removing a few of the dishes out of the cupboards entirely (if you will find tons) — fewer dishes means the pile of dirties can never get too poor. Let your roommate know how serious it is for you, and begin keeping separate dishes. Their dirties can go in a dishpan out of sight under the sink until they are ready to deal with them, and your clean ones could be stored wherever you like (even on your room if necessary).

Sarah Phipps Design

Decide how to take care of groceries and stick with it. A roomie who eats your food without inquiring is up there with the person who renders the dirty dishes piled up in the sink. Let’s hope you never need to live with somebody who does both.

The best method to avoid conflict around food is to agree early on how you will handle groceries, and stick with it. Here are three common ways to take care of the food situation, along with pros and cons:
Discuss everything. For some, sharing meals and splitting costs evenly works out with no hassle. Conflicts can arise if one of you has friends over a great deal and feeds stated friends from the (allegedly) equally shared meals stash. Should you go this route, make clear that the food is for roommates only. Independent sides of the refrigerator. Shop separately, and keep your mind off your pet’s meals. This can be a wise option if you have a tendency to buy very different sorts of meals (i.e., 1 roommate is vegetarian, yet another loves meat). Share staples, split the remainder. This compromise sounds good, but can be a little tricky in training. Make sure that you agree on what’s on your list of staples, and trade off paying for them.

Cynthia Lynn Photography

Share bathroom cleaning (and other onerous tasks). Nobody wants to clean out the bathroom or take out the garbage, but it has to be done — and when one ends up doing the dirtiest jobs all of the time, tempers can flare.

Set up a chore chart someplace easily viewed with housemates, and use it to rotate tasks. Common courtesy dictates that every person should pull her or his own hair in the drain after showers, and replace the soap or TP if you apply the last of it.

Corynne Pless

Don’t monopolize the TV and stereo. With notebooks and iPads, sharing the TV is not as much of a problem as it once was, but it is still not fair to hog the huge screen. Each roommate should have the chance to watch favorite shows and get an equal chance to DJ the sound system. And no judgments — everyone is permitted to watch (or listen to) total junk from time to time!

Lauren Gries

Create a landing zone to take care of mail. Especially among the first-apartment set, keeping track of bills can be problematic — and it only takes one missed payment to wreak havoc on your credit score.

Make things easier on yourselves by setting up one spot where email always lands as soon as you walk into the door.

Make a spot for a charging station for devices, and you won’t lose them.

Taylor Jacobson Interior Design

Be respectful of your roommate’s schedule. If you understand your roommate must get up early, be polite and keep noise down at night.

Always speak with your roommates about celebrations in advance, and bypass it if a roommate asks you throw the party another weekend.

Corynne Pless

Respect personal space and possessions. Do not go into a housemate’s room when they are not home, and do not use or borrow whatever theirs without asking. Should you share a bedroom, do not sit or put stuff on your roommate’s bed. And should you borrow some thing (with permission) and it gets stained or damaged, it is your responsibility to have it cleaned, repaired or replaced immediately!

If your roommate was taking your things without asking, have a conversation with her about it as soon as possible. She might have only assumed it was OK with you, so be clear about how and what you are prepared (or not willing) to share. And be honest: If you frequently borrow your roomie’s shoes, do not get your feathers in a ruffle if she dominates your sweater.

Sealy Design Inc..

Keep up with your laundry. Big, stinky piles of dirty laundry can win you no more lovers, even when the piles are comprised to your room. Keep that laundry moving, or make regular trips to the laundromat if you don’t have access to a washer drier.

For roommates who neglect laundry, step one is getting them to keep it contained for their own space. Offering to go along on a shopping trip for additional hampers could be enough to get the message across.

Corynne Pless

Practice the golden rule. See to your roommates as you would like to get treated. When something is bothering you, then tell them in a clear but polite way instead of letting bad feelings fester. And remember that small, fine gestures — such as bringing home flowers to your dining room table or a bag of biscuits to share — could go a very long way to exude calmness.

Tell us Share your best (or worst) roommate tales in the Remarks!

See related

Be Your Own Best Florist Having a Bouquet Garden

Where you most appreciate the beauty of plants, think about an area in your garden. Now imagine bringing that favorite piece of your garden inside as a bouquet. You may be amazed to find that the mixtures composed of many of your favorite flowering shrubs, perennials, vines and even trees can be employed to make a beautiful tabletop bouquet — and also inspire the next year’s plantings.

Noelle Johnson Landscape Consulting

Creating a bouquet is not difficult. In fact, it can be as easy as filling a vase with the stalks from a single flowering tree. Or try pairing flowering shrubs with vines and perennials. Whether your bouquet is made of a type of plant or several, there are possibilities.

The purple blooms of Texas ranger (Leucophyllum frutescens)make a great pairing with the orange blossoms of orange jubilee (Tecoma x ‘Orange Jubilee’).

Noelle Johnson Landscape Consulting

Selecting the Right Plants

you might be amazed to find that many of the existing flowering shrubs, perennials, vines and trees in your garden are acceptable for producing a backyard fragrance.

Revealed: Honeysuckle

Noelle Johnson Landscape Consulting

Your garden may be filled with flowering plants, but how do you know whether they’ll hold up in a bouquet without wilting immediately?

The easiest way to learn whether a plant can be utilised in a fragrance would be to cut a stem or two, place them in water and see how they consume. When the flowers wilt or droop straight away, then they won’t make a fantastic bouquet. Ideally they’ll last at least 24 hours.

The red blossoms of Jupiter’s beard (Centranthus ruber)form the perfect background for its purple blossoms of chives (Allium schoenoprasum), each of which can be utilised to make a bouquet.

Noelle Johnson Landscape Consulting

Garden bouquets typically don’t last so long as people purchased from a florist, but they’re a creative and unique manifestation of your garden.

Here a small bouquet includes flowering annuals violas and alyssum, paired with the pale pink blossoms of pink bower vine (Pandorea jasminoides).

Noelle Johnson Landscape Consulting

Don’t limit yourself to flowering plants. Plants with vibrant foliage or interesting textures and shapes can make fantastic additions to your garden bouquet.

Language ivy (Hedera helix)looks fantastic when inserted into a floral bouquet, since it will drape down the sides of the vase. The large leaves of hosta can be utilised to make a gorgeous backdrop for flowering plants.

As the seasons change, so will your garden bouquets, as distinct plants peak on your garden. When the weather starts to cool and the flowers start to fade, you can create a bouquet without blossoms, using seed pods out of your favorite trees instead. Seed pods from trees such as jacaranda (Jacaranda mimosifolia), screwbean acacia (Prosopis pubescens), sweet chewing (Liquidambar styraciflua)and tulip poplar (Liriodendron tulipifera)can be utilised to make a uniquely lovely and seasonal bouquet.

Revealed: Variegated English ivy

Noelle Johnson Landscape Consulting

Organizing Your Garden Bouquet

Look to the garden.
You do not need to become a floral designer to figure out how to arrange flowers. For inspiration about what plants to use in your aroma, look at the way the plants are arranged on your garden. Note which plants look great together and try to mirror the identical arrangement in a bouquet.

A simple way to get started is to use a combination of 3 plants: a more slender flowering plant, such as a tree, paired with a medium-height perennial and a low-growing floor cover.

Set the taller branches or stalks toward the trunk or center of your bouquet and add the remaining plants in order of height, ending with all the shortest plant, just like from the landscape.

Noelle Johnson Landscape Consulting

Use the color wheel. Look to the garden for notions about which colours look great together. With a color wheel can also help you figure out which colors look great when combined. Group trendy colors, like pink, purple and white, for a beautiful bouquet. Or, if you want darker colours, use plants with red, orange or yellow blossoms. For a dramatic color contrast, pair flowering plants with trendy colours with those who have warm colours.

In the bouquet shown here, the contrasting colours of purple trailing lantana (Lantana montevidensis), yellowish Desert Marigold (Baileya multiradiata)and yellow-orange Cascalote shrub (Caesalpinia cacalaco) blossoms make an attractive mix.

Noelle Johnson Landscape Consulting

Bouquets created from the garden tend to be unstructured and loose, appealing in their simplicity.

The pink and white blossoms of globe mallow(Sphaeralcea ambigua) form the perfect background for the lavender blossoms of Goodding’s verbena (Glandularia gooddingii)in front here.

Noelle Johnson Landscape Consulting

A single type of flower can make a wonderful arrangement. Bouquets can be large or small depending on which plants and containers you use, by a large vase filled with azaleas to a small glass bottle with a lot of violas.

Revealed: Azaleas

Noelle Johnson Landscape Consulting

Planting Your Own Bouquet Garden

What if you do not have a garden filled with flowering plants acceptable for a bouquet? Go ahead and plant your own bouquet garden.

Here are some popular flowering plants which grow in a variety of climates and will enhance your outdoor garden in addition to beautify your home if made into bouquets:
AzaleaBleeding heartBuddleiaClematisConeflowerCoreopsisCrape myrtleForsythiaHoneysuckleLantanaLavenderPincushion flowerRhododendronRudbeckiaSalvia spTrumpet vineOf course, these are simply a couple of plants which can be brought indoors to make garden bouquets. Read the blossoms section for more ideas.

Noelle Johnson Landscape Consulting

When deciding which plants to improve your bouquet garden, then pick the ones that will have overlapping bloom periods so you can make bouquets throughout most of the year. Incorporate a mixture of flowering shrubs, perennials and vines. Soon you will have not just a gorgeous garden outside, but one which will allow you to attract the beauty of the garden inside.

More: How to Make Beautifully Untamed Floral Arrangements

See related

Finishing Touches: Professional Strategies for Installing Fixtures in Your Tile

A bathtub’s tile design can depend on just how your fittings and lights meet the tile. Ideally, fixtures are installed centered on a tile instead of on a joint. However, this involves cutting the tile, which is a process. Sometimes the holes end up in bad places on the tile design, and on occasion the tile can break.

These measures can help shorten and simplify the process. Cutting holes in tile does not have to be difficult — there’s only a different method, drill blade and bit for every type of material. Whether you are working with a tile setter or trying a small tile project of your own, understanding the ins and outs of the process can allow you to get the best possible outcome.

Martin Hulala

Bigger shower trims (plumbing fixture cover plates) are substantially easier for tile contractors to operate with. The bigger trim has more wiggle room and does not demand a very small tile cut.

Hint: Cutting a small square or rectangle could be simpler than drilling a large hole into tile. Consult your own tile installer to check your trims to find out if a small square cut will get the job done.

MAK Studio

What a tile design that is fantastic — it resembles no drilling was needed. I really like the bath filler comes from the center of four tiles.

Often the trimming for plumbing fixtures covers a massive area. For an installation like this, it could be simpler (and safer for your own tile) for an installer to clip each tile corner at a 45-degree angle rather than drill one-quarter of a hole to each tile nook.

Hint: You’ll need your installer to take note of any seal gaskets (the washer that prevents water from getting behind the trim) and plan your cut so that the gasket is correctly backed by the tile.

By Any Design Ltd..

Ceiling spaces can get cramped, so positioning everything right is vital. This bathtub’s steam generator and lighting have the ideal position. Since the lights fall at the center of the tile, a grout joint won’t weaken their vapor-tight seal.

Hint: Strategy these lighting places early so that you can make sure there isn’t any ceiling framing in the way of where you need your brand new showerhead or light fixture. We assembled this ceiling’s framing to specifically accommodate the massive rainhead and four LED pool lighting.

Ceramiques Hugo Sanchez Inc

This is one of my favorite baths. The oversize tile is installed perfectly. The tile for the shower controllers was drilled to get the pipes and mitered across the long edge (the base of the tile) to fulfill the tile on the top of the niche. Thus much effort for only 1 tile, but this look is well worth it.

Hint: Ask your installer to put in the tiles on your key focal points to make sure you get the precise look you desire.

W. David Seidel, AIA – Architect

This smart tile design didn’t need any drilling every fixture hole is set over a grout joint. This tends to be the easiest approach for sink installations similar to this, as you need to make only a semicircle cut in each tile. This is sometimes carried out with a blade, rather than a drill.

By Any Design Ltd..

Diamond Coring Bit – CAD 40

This is my favorite type of drill bit. These diamond coring pieces cost about $40 where I reside.

High-speed drills can destroy these pieces, so I favor having a low-speed cordless drill or a variable-speed corded drill to get slow drilling.

Hint: For holes bigger than 1/4 inch, tile and glass pieces usually work best. I try to keep three or two available for the smaller items in a toilet, such as toilet paper holders and shower bars. These pieces work well for ceramic and ceramic tiles, but I avoid using these on stones such as slate.

Gast Architects

When you or your installer drills tile, ensure there’s a small bucket of cold water nearby to cool the piece often. In case the water at the cuts begins to boil, then the piece hasn’t been cooled often enough. If a diamond piece gets too hot, the diamonds will fall off the drill bit and make it useless.

Hint: Drill especially slowly and stop constantly to cool the drill bit when drilling glass or some other tile. Glass cracks easily when it gets too hot, and the threat is high once you’re drilling into it.

By Any Design Ltd..

The tile pro who tiled this shower drilled a great hole to the shower hose. These holes have been drilled quite close to the edge of the tile, and that is hard to get right.

Hint: When drilling holes so close to the edge of the tile, ensure the tile is shielded from vibration damage. Fully support the tile whilst press and drilling to keep the tile from penetrating.

More:
How to Pick Tile for a Steam Shower

14 Power Tools for Your Home Shop

See related

Get the Mystery of a Beautiful Garden for Yourself

Gothic gardening can bring ideas of Mary Shelley’s Frankenstein and Victorian books, but Gothic backyard layout simply follows the architectural style predominant in Western Europe at the moment; in the 12th century, Gothic structure has been characterized by thin vertical pillars and tall pointed arches, with a focus on height and open spaces.

The Victorians adored the Gothic style and revived it, both in their architecture — such as the British Houses of Parliament, in London — and within their furniture, backgrounds and cloth design, like that of the Arts and Crafts entrepreneur William Morris. It’s this Victorian Gothic revival style we are familiar with and that we are able to use to our advantage to create gardens of mystery and serenity.

Many characteristics of Gothic style, for instance, careful positioning of stonework and statues combined with natural, even wayward, plantings, can fit comfortably in gardens today without turning them into a pastiche of a horror film. Combined with the medieval love of decadent decoration and abundant colors, intriguing elements of the Gothic style could be woven into modern garden design.

Does Your House Have a Medieval Heritage?

Lenkin Design Inc: Landscape and Garden Design

Gothic gardens can offer the feeling of refuge we look for in our gardens today, allowing us to escape the stresses of modern life. Although the early period in Europe was unsettled, to say the least, with conflict, civil wars and outbreaks of the Black Death, the enclosed gardens constructed during those times provided some kind of respite from the horrors of daily life.

Through the accession of easy stonework and statuary, and the selection of plants which grow naturally, providing an almost unkempt feel, a Gothic-style garden could be a refuge without too much maintenance.

Without doubt, I think this style of garden design can bring a feeling of serenity not generally associated with the term”Gothic.” I like to think that the naturalistic plantings create enclosure, such as embracing arms, while the statues and older stonework bring ideas of yesteryear, echoes of antiquity which aren’t in any way frightening.

Andrew Renn

Gothic Garden Features

The pointed arch is with no doubt one of the very Gothic architectural capabilities. Often seen from the majestic Gothic cathedrals of northern France and England, the pointed arch shot over for the more curved Romanesque arch in the 12th century. Here it is used as a gorgeous gateway, setting the scene to the Gothic-style garden inside.

Common Ground Landscapes

Enclosed Gothic gardens do not need to be both black and claustrophobic. Gothic buildings, like the great medieval cathedrals of Europe, were light and airy, with a fantastic sense of space. Open fencing with narrow, upright rods will help create the feeling of verticality so beloved by Gothic architects.

Haddonstone Ltd

To most, Gothic gardens inspire mysterious ideas, but stonework does not need to attract dreams of cemeteries and tombstones. Arched windows, pillars or even only sections of stonework can add that touch of mystery while at the same time creating a fantastic frame for climbing plants. Old stonework are discovered in reclamation lawns; sensible reproductions, like these, are also offered.

Goessling Design

With climbers twining through, this wooden framework serves the same purpose as stonework. Though simple in design, it has the Gothic features of space and height while at the same time providing a frame for climbing plants. If you consider yourself useful, it would be rather simple to assemble this framework using a hardwood which will weather to a nice warm grey.

Lenkin Design Inc: Landscape and Garden Design

The careful use of statues really brings the Gothic feel to a backyard — angels or mythical creatures being the favored types. Mature, weathered statues are greatest, but you are able to paint new ones with live yogurt to get a fantastic growth of algae, making them look older.

Unlike formal gardens, where statues are isolated and showcased, statues from the Gothic setting are inclined to be nearly hidden by climbers. Ivy is possibly the preferred, but easy white climbing roses, such as the Sally Holmes increased shown here, can offer a stunning contrast to the stonework.

Margie Grace – Grace Design Associates

Plants of a Gothic Garden

Roses ought to be contained on your Gothic backyard. They were a favorite in medieval art and tapestries, and even the Victorians, such as William Morris, utilized them in backgrounds and cloth design.

Go for the simple colors and forms; white and red bush or climbing roses produce a classic feel, though a number of the modern David Austin roses would also offer a rather wild, intimate look growing through stonework or implanted in aged urns or containers.

The New York Botanical Garden

A real winner is an improved that unites both strong Gothic colors and conjures the medieval improved Rosa damascena‘Versicolor’, which was stated to unite the increased colors of the Houses of York and Lancaster, which battled over England from the Wars of the Roses.

This modern improved variety, floribunda George Burns, would make a perfect replacement for your Rosa damascena, though it does have traces of yellowish inside a number of the blooms.

Beertje Vonk Artist

The ideal white sands climbed for scrambling throughout slopes and stonework is Rosa filipes‘Kiftsgate’. In early to mid-July it is coated in panicles of white blooms and looks like a cascading waterfall.

This recommendation comes with a warning, however. I’ve seen it growing in its birthplace, Kiftsgate Gardens, which is just down the lane in the famous Hidcote Gardens from the English Cotswolds, also it is a rampant climber, developing high into the tops of mature trees.

Fullmer’s Landscaping, Inc

Evergreen English ivy, Hedera helix’Thorndale’ (shown here),is another mainstay of Gothic planting. Let it scramble over stonework and develop walls to soften lines, or use it like a fantastic ground cover even in the deepest of shade.

Ivy is pleased to grow on wire supports, therefore it is easy to create easy topiary shapes which will be quickly covered by the ivy.

Zeterre Landscape Architecture

Here scaling plants are used in an entirely different manner, turning brickwork into virtually living architecture, reminiscent of buttresses of Gothic buildings.

Troy Rhone Garden Design

With weathered stonework and statues combined with the dark foliage of ivy and roses, you would feel a Gothic garden would be rather funereal.

But Gothic style also comprises the rich colors of the medieval period. Plants with flowers of dark blue, deep red and purple, echoing the brocades and velvets of the period, stand out from dark foliage and light up the backyard with the brightness of a William Morris wallpaper.

Earthwork Landscape Architects

Even the skeletons of long-dead plants can be utilized to advantage in the Gothic backyard by helping to offer a feeling of mystery and enchantment. Here the vines of dead ivy cover a construction wall and have taken over the landscape.

Matthew Cunningham Landscape Design LLC

When the garden is complete, plants are left to their own devices and the right atmosphere has been created, it’s time to sit — on your Gothic pointed-arch chair, naturally — to delight in the calmness and mystery you have created.

More: Does Your House Have a Medieval Heritage?

See related

Unwind in Your Own Private Garden Escape

Most of us have a mental go-to location — somewhere we’ve been that gives us a feeling of comfort and safety. Imagining ourselves there can help us regroup at the middle of a hectic day. Some of the very productive and successful men and women in our society have learned the secret of accepting five-minute mental vacations when the daily grind appears to inundate them with tasks and migraines.

My mental go-to location is an overlook near Grandfather Mountain in western North Carolina. It is a wonderful location of escape. Anxiety disappears as I make my way over a footbridge and between boulders as tall as three-story buildings. Water trickles from the mountain between the rocks, nurturing innumerable ferns and rhododendrons. A primordial mist and aromas engulf me as I climb toward the peak. There I can sit and gaze out over countless mountains. I feel like I could see forever. Lichens and some brave rhododendrons that have taken hold in the cracks between the enormous plates of rock are my companions. Life is placed into perspective.

You can design a private garden space in your corner of suburbia that authentically speaks to your go-to location and activates those relaxing, pleasant memories. Regardless of how your place looks in your mind’s eye, certain design principles will help you achieve that feeling of comfort and well-being you need and deserve. Your model of my mountain overlook could be waiting for you behind your garage or outside your kitchen door, just past the recycling bin and the electrical meter.

You know the location. Let’s make it happen.

JSL Exteriors Landscape Design/Build

Create a transition to remind you to look at your hectic day at the doorway. Every private backyard needs a entry. This offers a backyard credibility and integrity, putting it apart from the outside world. An entrance could be a pair of older doors, a trellis with a gate, stone pillars on either side of a pathway, a concealed opening at a tall hedge, a pair of a bridge.

Jean Brooks Landscapes

Don’t you just want to slip between the opening in this fence and experience what’s beyond? Perhaps a stone pillar or metallic sculpture of Asian sway located to the left of the opening will welcome you house at the end of a long workday.

Whatever kind your entryway takes, it is a reminder to leave your concerns at the doorway. Don’t we all need those occasional reminders?

Katia Goffin Gardens

Less tangible. Go natural. After a day of work in the concrete and asphalt jungle, who needs to come home to a lot of that? To mepersonally, a go-to backyard is all about people and plants, the way they interact and coexist. Unless you have a good reason to use excessive hardscaping, why not use dirt or gravel instead?

Both are permeable, inexpensive and, most significant, feel good under your feet. Mulch pathways cushion the feet and bring to mind the seemingly audible quiet of a wilderness retreat. Gravel crunches underfoot, making the most beautiful sound.

Matthew Cunningham Landscape Design LLC

Use mass plantings to make stream. “Flow” is one of those words which is better felt than ever defined. This photo defines “stream” better than any dictionary ever could, and it feels right, doesn’t it?

Utilizing lots of plants of the same species creates unparalleled visual effect. A buddy of mine explained that she would go to the nursery, spend $1,000 on one of the and among that rather than notice them since they became visually engulfed by her large space. Collectively we planted 80 fall ferns at a serpentine line around the back of her pond. She was amazed by the visual effect when she stood and saw the outcome.

The reason why the idea of mass plantings works so good is that the eye flows uninterrupted, seeing the whole space as one component. The result is most assuredly a calm sense of comfort.

Jay Sifford Garden Design

Establish rhythm in your garden. Most of us have an internal rhythm. A number of that is static, portion of who we are, and some of it changes according to our circumstances and moods. Heart and breathing rates are just two of the most noticeable kinds of internal rhythm, but your normal stride and style of walking and that melody that continually plays in your head are other kinds of your private rhythm.

You can present the notion of rhythm in your backyard by repeating certain important elements, as was performed with these sculptural ceramic orbs. By spacing them further apart, you can slow down your rhythm, making a more relaxing backyard experience. Closer spacing might actually reduce your sense of comfort by simply making the room feel busier and more congested. Considering these orbs alternate from side to side along this path, the eye is drawn down to a concealed portion of the backyard. Why? Because rhythm is created, and this rhythm interferes with your internal rhythm. If you have ever thought to yourself, “This backyard speaks to mepersonally,” rhythm is possibly the reason.

Tip: When doing a rhythmic installation such as this, strange numbers of things are always more gratifying to the eye.

James R. Salomon Photography

Use curved bed lines. While directly bed lines fit nicely into a formal garden, they are sometimes much too rigid for your go-to space. Indeed, they may interfere with your goal of comfort unless your go-to space involves a queue, a theme park and a roller coaster. You will find that curved bed lines will calm you down and inspire a sense of well-being and creativity.

Another advantage of utilizing curved bed lines is that they make it much easier to transition from one type of planting to another. In this manner your plants won’t wind up looking like cans on a grocery store shelf.

Jay Sifford Garden Design

Introduce the element of water. Few things have caught the imagination of the human race like water. Water Resistant and sustains, absorbs and reflects light, and gives a home to a multitude of creatures, all which are reasons to include some type of water component in almost every garden. The noise and motion of water attract a distinctive amount of visceral cartoon to the backyard.

The certain type of water feature you decide to integrate into your private space will be different according to your affinities, budget and space. You may choose a naturalistic type of pond like the one shown here, or perhaps a trickle of water flowing through a bit of bamboo in a Japanese garden.

Tip: Consider having your water feature professionally equipped, and purchase the best equipment you can afford. There’s nothing relaxing and nurturing about broken pumps, algae blooms and water flows.

Refine your plant colour. Now on to the fun part. Creating a plant palette may be an intimidating task for many gardeners, so here are a few pointers.

Limit your colors but explore shapes and textures. Vibrant warm oranges and showy pinks might be overpowering at a comfort garden. If you study the garden shown here, you’ll find that the color palette is very restricted. The majority of plants used in this garden are either bluish gray or tan. Green is used to subtly weave continuity into this space and to provide the eye a place to rest. Likewise, most of the crops are mounding with a few accents of spikes. This mounding form is reinforced by boulders.

What gives this backyard a punch of attention is really the massive variation in texture, from the rock steps and boulders to the a variety of leaf textures. Limiting the color palette and shapes produces a sensory base of relaxation so that the viewer is encouraged to explore the wonderful selection of textures.

Randy Thueme Design Inc. – Landscape Architecture

Similarly, the designer of the space significantly limited the color palette and even the plant contours to give prominence to texture. You don’t need a huge space to pull this off; you could easily re-create the appearance on an apartment balcony.

Matthew Cunningham Landscape Design LLC

Consider the use of moss. I am aware of no other plant which so readily nurtures a feeling of relaxation.

Moss can now be purchased by the square foot. Carefully study which type is best for your conditions. Some varieties can take more sun than others; some favor sandy soil, but others favor clay. Moss doesn’t need perfect dirt, but it does need daily watering until it’s well recognized. The payoff would be well worth the additional effort on front.

Add a weeping or pendulous tree. This may sound simplistic, but weeping and pendulous plants really do assist us feel rested, while upright spiky plants exude electricity and activity. Picture yourself doing the comfort technique of gradually breathing in and breathing out. Notice two things: the position of your body after you exhale as well as the corresponding feeling.

Weeping and pendulous trees imitate this form. Notice that the superb pendulous Alaskan Cedar trees (chamaecyparis nootkatensis, zones 4 to 8) in the photo. Don’t they lend a feeling of calm?

See related

Want a Clear Decorating Conscience? Try Recycled Glass

Although glass was once a costly material used in very limited applications, today’s large-scale production systems are made glass a huge portion of our lives. Though its attractiveness is a welcome addition to the home, the negative side of this romance is that without recycling, glass goes right to the landfill once we’re finished with that. Though glass is inert and not directly hazardous to the planet, it stays in landfills indefinitely.

The good news is that glass is more recyclable — not only once, but on and on, without any degradation of the material. Consider a few of those ideas for bringing the sparkle of recycled glass in your residence.

West Elm

Recycled Glass Jug – $19

The fundamentals: Recycling reduces the amount of waste glass the demand for raw materials quarried in the landscape. Additionally, it uses 50 percent less energy to recycle glass than to create new glass out of sand, soda and lime.

Plus, the more cullett (crushed glass) used to create recycled glass, the lower the temperature the furnace should reach — and that prolongs the life of the furnace.

Programs: Recycled glass countertops have made it even simpler to incorporate recycled glass in the home. They come as 100% recycled glass as recycled glass combined with resin or concrete.

Recycled glass backsplashes, tiles, tableware, accessories and even processors (shown within a landscape) can all be used to create your home and backyard beautiful.

Woodmeister Master Builders

Experts: Recycled glass may be coloured and backlit, and may have various textured finishes implemented, so the design options are bountiful. More significant, there is an expansive glass recycling civilization in both the United Kingdom and the United States, which eliminates any need to buy recycled glass products from different countries if you live there; you won’t trash its green credentials with unnecessary transport.

Lindy Donnelly

Recycled glass is also durable. Glass is among the few substances that may be recycled infinitely with no losing strength, purity or quality; recycled glass products are as durable as the first glass.

Bill Fry Construction – Wm. H. Fry Const. Co..

Disadvantages: There are very few disadvantages to recycled glass, with the exception of the high price of some products. Do your research — recycled glass tableware is usually fairly priced, but recycled glass construction materials can get expensive.

Latera Architectural Surfaces / Dorado Stone

Considerations: Glass chip-based products rely upon concrete or a resin-binding material. The recycled content of those mixed work surfaces ranges from 70 to 85 percent.

Environmentally it requires a lot of energy to extract the raw materials and produce the cement. Resin, generally, is a petrochemical product derived from a nonrenewable resource (unless it’s formulated from plant-based sources). For concrete, look for combinations. But, transport costs for this thick material can be large, both environmentally and financially.

Shannon Malone

Upcycling: In the United Kingdom we import more brown and green glass than we can recycle, so we send green crushed glass back to Portugal for recycling. Since coloured glass has to be separated out of clear glass in the recycling process, think about upcycling those wine bottles intact — like this light fixture that is innovative.

More: Your lead to an ecofriendly kitchen

See related

Design It Like a Man: Tips for Single Guys Planning a Bedroom

I’m always interested in gender differences in regards to design. Being a man, I’m especially on the lookout for styles that appeal to masculine tastes. But essentially it’s a means with no end, as it’s hopeless — and impractical — to lump all men into a category of style. Everybody differs.

However there are a few similarities that tend to span the spectrum of what men want — and which differ in women’s preferences — when it comes to design. (These similarities are easier to spot with single men, because the style is unadulterated by someone else.) One is the way we talk about and describe design.

NICOLEHOLLIS

Nicole Hollis, an interior designer in San Francisco, has discovered that men usually adopt a very special vocabulary when describing what they want. Chat almost consistently turns to automotive design — nice leather, hand-crafted wood, unique sewing, polished metals. Feeling, color and texture gleaned from fine artwork are referred to as well, and so is technology design, such as the sleek and minimalist expression of this iPad.

If you’re one man seeking to design, say, a bedroom or if you’re designing a bedroom for one man — there are a number of things that you’ll want to consider. To get your creative juices flowing, try to think about this ideal hotel room you’ve stayed in. “Lots of men travel for company, and their only introduction to luxury spaces has been in hotels, so their requests tend to mimic people,” Hollis says.

It is a good place to start. Hotel suites are inclined to be calm, have great beds and also have minimalist design that discusses efficiency, practicality and performance — all hallmarks which form what many will call masculine design.

Here a bedroom designed by Hollis for a travel bachelor in the fund industry recalls European hotel suites in which he remained on business trips. A suede headboard, custom made European oak bed and white cowhide rug soften the clean, minimalist design. Practical luggage racks in the close of the bed provide a place for your homeowner’s suitcases.

Shirley Meisels

Interior designer Shirley Meisels claims the sleekness that men seek ought to be softened just a bit, a strategy she took when designing this Toronto bachelor pad. “A home has softer touches,” she says. “The bedroom should be a soft place to land in the end of a long moment. Add cushions, something and a blanket comfortable and cozy. That’s what makes a house a home.”

Chair: Design Within Reach; bed: custom; carpeting: Elte

Frances Bailey

Strategies for Single Guys Designing a Bedroom

stressing your lifestyle.
An interior designer will almost always begin a job with an interview to get at the source of how you live. Do you travel a lot? Work a night shift? Do you require blackout curtains? See TV in bed? Turn on the information in the morning? This will dictate the layout and put focus on significant elements within the room, such as splurging on a top-of-the-line mattress as opposed to built-in audiovisual equipment.

Do not be covetous. Just how long do you plan to live independently? Occasionally it isn’t a matter of if somebody else will move in but when. This goes for men and women. If you’re designing a space, you might want to consider how it will accommodate a different individual and his or her style. Should you include a mirror? More cupboard space? A place for a hair dryer and curling iron in the bathroom? Will the colours, textures and furnishings appeal to other people or just your personal tastes?

Pillows: Ralph Lauren Home

Mauricio Nava Design, LLC

Stick with neutral colours. Guys tend to feel more comfortable using a palette of white, gray and black. Think about adding color with a bit of artwork or an accessory rather than a big, splashy red wall or bright bedding. And be sure to balance out the neutrals. “Dark and grey can be very harsh for a bedroom, so I try to make it feel cozier,” Meisels says. “To soften I present natural materials such as linen, wool and natural stone.”

Mirrors, nightstands, Amelia bed, lamps, carpet: Top Fashion Home

Chicago Luxury Beds

Do not skimp on the mattress. Many men travel a lot for work and aren’t home very much. Possessing a calm and serene bedroom and, most significant, a comfortable bed to come home to ought to be a top priority. OK, you might not want to drop $32,000 for a queen-size mattress like this Hastens, but you get the idea. Invest on your sleep, bro.

Frances Bailey

Contemplate your audiovisual equipment. Meisels has a lot of requests to incorporate technology into men’ bedroom designs. But having a TV and gaming consoles on your bedroom can disrupt sleep, so be certain these devices can easily be put away when it’s bedtime.

TV cabinets, built in wall systems and screens that drop down from the ceiling are all worth considering.

Benning Design Construction

Display your own stuff. Hollis notes in her experience, men tend to amass more things than girls — surfboards, vintage guitars, stereo equipment and old cameras — and they always want to display them. Think about the things you collect and how you are going to want to incorporate them in your design.

NICOLEHOLLIS

Follow function. Guys want a place for all. We want the plugs right from the bedside table to our phones and devices. We want a spot for the remote right on the nightstand, and we want big dressers and closet systems for our garments.

Learn where your apparatus will go and be certain you have a place for them. “If I tell a man, ‘This is where you set your shoes,’ that is where he’ll put his shoes forever,” Hollis says. “They enjoy that programming in the house so that they do not have to consider organizing”

Hollis made this space for a young physician. He works night shifts and needed a dark distance suitable for sleeping through the day. Floor-to-ceiling curtains, a dark brown sisal carpet and warm wood do the job.

Carpet: Stark Carpet; curtains: Martin Kobus; dresser: Restoration Hardware; pendant lights: Leucos; bed: custom

Photo by Ben Mayorga

See related