Monthly Archives: January 2019

11 Distinctive Details for Upscale-Looking Upholstery

I looking at upholstery particulars. I make and purchase seats, sofas and headboards frequently and have studied various tucks, seams and welts for years. Particular details really do specify a appearance of a chair, much like a necklace or scarf may change the vibe of an outfit.

Learn upholstery lingo and consider some new details for your next upholstery job. Here are some of my favorites and the attitudes they communicate.

J. Hirsch Interior Design, LLC

Among my favorite choices for a chair is that a dressmaker’s cut, occasionally referred to as a drop skirt. It creates a casual but tailored vibe. This detail works great with cotton and linen. Notice the contrasting band at the underside edge. Pretty!

Annette Tatum

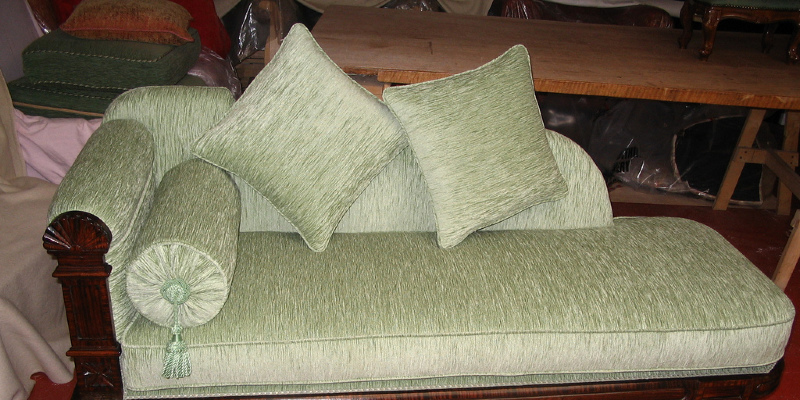
An English arm using a T-seat cushion is just another one of my favorite upholstery particulars. This appearance is elegant yet also casual. The fit is precise and shows a pattern nicely.

Comfort Works Custom Slipcovers

A pleated slipcover is a fantastic alternative for chairs and sofas. Slipcovers are practical and also a fantastic choice for homes with kids or pets, but occasionally they may look cluttered and ill fitting. The pleat provides just a subtle detail so the slipcover looks as though it fits properly.

Tobi Fairley Interior Design

A box cushion is a nice choice for bench or banquette seating. A box cushion is made with a foam core for a nice squared-off shape. Sometimes construction consists of a foam core using a downward wrap. The advantages here are finished with a little self-welt.

Cecilie Starin Design Inc..

This gorgeous chair has a lot going on. The details are extremely subtle but visually effective. The chair has a contrasting face on the chair cushion. Moreover, the chair and back have a dual welt for extra elegance. Gorgeous!

Sarah St. Amand Interior Design, Inc..

Contrasting fabrics are a excellent detail for seats. Try out a contrasting fabric on the inner back of a chair, just like with this handsome armchair. Create interest with materials that relate to one another in colour or pattern.

Paula Grace Designs, Inc..

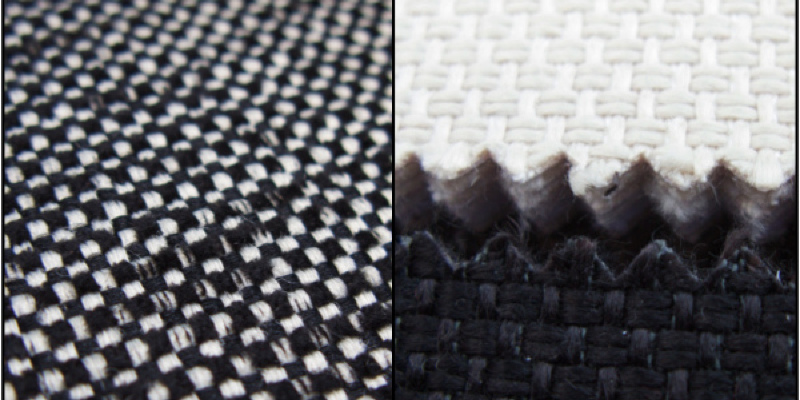
Try out placing stripes rather than vertically. This makes a space feel a bit more updated and modern. Notice that the welt with this chair was cut on the bias, which means the stripe was placed with a soft slant.

Abbe Fenimore Studio Ten 25

Nailheads pump up the detail on the back of your sofa. If you have a sofa set away from the walls in an area, look at dressing up the back. The simple nailhead detail here adds a modern touch to the squared-off lines.

Jamie Herzlinger

Diamond tufting is a detail to your chair, sofa or headboard that creates extra cushion on tight-back upholstery. A tight spine does not have as much “cush” as a loose back, so the diamond tufting constitutes that. It tends to feel modern in a strong and more conventional in a pattern.

Cecilie Starin Design Inc..

A tufted, rolled arm is unmistakably traditional. This is occasionally referred to as a chesterfield fashion; the tufting this is daring and overscaled.

Bauhaus Custom Homes

Channel tufting is a fun detail that may add vintage appeal or modern flair to any type of chairs. Based on what it is paired with, this detail may evoke ’20s a midcentury modern vibe. It feels nice and pleasant, too, and really is a fantastic choice for men and women that like symmetry.

More: 3 Extreme Chair Makeovers

See related

8 Low-Cost Ways to Personalize a Front Entrance

It’s always tricky to prioritize decorating dollars, and I tend to funnel most of mine into interior enhancements: furniture, fabric, tchotchkes. But lately I have been thinking that the outside of the house — and especially my front entry — deserves its share of this love. The entry might be the very first impression of a home, and my entry is best called mousy.

Fortunately, jazzing up front entrance doesn’t have to cost a fortune. Try out these eight strategies to make a showstopper entryway without blowing your budget. Got another trick to add? We’d like to hear the facts in the Comments!

S / Wiley Interior Photography

1. Create a miniature room. Here a bench with cheery outdoor pillows, a hanging paper lantern along with a framed chalkboard combine to turn a simple entrance into a sitting space all its own — all without breaking the bank. Mix and match furniture to fit your home’s architecture and style.

Wind and Willow Home

2. Spell out a welcome. A stencil, a can of spray paint and presto! An plain concrete stoop becomes a hospitable howdy. If you can not or do not want to paint right on the surface, try stenciling a plain cotton or sisal doormat instead.

Sterling Publishing

3. Invest in showstopping hardware. Swap out dull doorknobs and knockers for immediate pizzazz on the cheap. It’s possible to search flea markets and architectural salvage stores for one-of-a-kind classic models, but even home centres take eye-catching styles these days. Decide on a knocker that offers a glimpse into your personality and interior design, while it’s an equestrian motif for horse fans or a nautical theme for a house on the coast.

Glenna Partridge Garden Design

4. Pile up plantings. Plants are among the simplest and most affordable ways to give your entrance a polished appearance, and they are able to boost any effect you’re trying for. Mass tumbles of old-fashioned blooms in tin or tole bathtubs for a cabin; stick with variegated greens and glossy containers in a contemporary setting. For a traditional house, make a symmetrical category of palms, ficus or roses in ceramic or terra-cotta planters.

Megan Buchanan

5. Lighting the way. Why settle for a dull outdoor lighting fixture once it is possible to hang a bit of eye candy? Outdoor chandeliers are superbly unexpected. If you want to use it for lighting, start looking for a model that’s designed for outdoor use, but in the event that you simply want the cosmetic effect, you are able to mount an indoor fixture without wiring it.

Garden Studio

6. Paint the door a unforeseen shade. It sounds obvious, and yet so many of us choose the easy way out and go with brown, black or white. If the task of choosing a bolder color throws you for a loop, try this trick: Snap a photograph of your property, then take it into the paint store so that you can see how different colors work with your exterior.

Select a color that contrasts strongly with the principal paint color: bright crimson paired with pale grey siding, turquoise from rusty red brick, plum on khaki stucco. Lipstick red in a field of white is a classic, but branch out and try other colors — perhaps kelly Chinese or green yellow.

Get advice on what color to paint your front door

Latin Accents, Inc..

7. Decorate the door surround. Set off front door and give it more existence by adding a decorative framework. If the structure will accommodate such a remedy, line it with ornamental tiles or a mosaic. Otherwise, you can attain a similar effect with paint.

Jeffrey Gordon Smith Landscape Architecture

8. Have fun with house numbers. Forget hardware-store amounts on the mailbox. Make yours soda: fun colors, beautiful fonts, creative placement. Just be certain you don’t sacrifice clear visibility and readability for the interest of interest.

See more on house numbers
Browse house numbers in the Products section

See related

Dining Place Makeover: Paint and Tea-Tinted Fabric Make Old Chairs New

When my husband and I bought our Dallas ranch house, we also became the owners of a dining set the prior owners had left behind. It was not our personality, but it was comfy, and as my father says, “Love the one you’re with.” After residing with the hand-me-down dining set for three decades, I was prepared for a budget-friendly update. Here is the way I took my dining seats from blah to bold one weekend.

Sarah Greenman

Time: 4 hours and drying period
Skill level: Moderate
Price: $65, even if you presently have a basic gun and screwdriver

Our dining room walls are painted a charcoal gray called Cracked Pepper from Behr, and we all understood reddish could pop from the dark walls.

Sarah Greenman

BEFORE: This is the first blue brocade upholstery.

Sarah Greenman

Tools and materials required:
Staple gun
3/8-inch staplesScrewdriver or drill
Spray can of B-I-N Shellac-Base Primer (I used two cans for four seats)
Spray paint in your preferred color. (I used two cans of glossy Apple Red from Rust-Oleum to refinish four seats)Spray can of polyurethane clear gloss topcoatSeat cushion materials:Box of tea to stain upholstery fabric (I used 10 bags of Earl Grey)
about 1/2 lawn fabric of your choice each cushion, depending on seat dimensions
Plastic sink, sink or soaking bathtub

Sarah Greenman

Repainting the Chair Frame

1.
Using your own screwdriver or drill, remove the screws from your chair cushions and place them apart.

Sarah Greenman

2. Take the chair frames out for painting. Cover the work area with an old sheet or paper; I utilized a large canvas drop cloth in my own backyard. Put on gloves and protective goggles. Spray each chair evenly with primer and permit them to dry thoroughly. This primer spray dries fast; the seats should be all set for the next step within 20 minutes.

Sarah Greenman

3. Spray paint the seats. Follow the can’s instructions and spray evenly and from the right distance for the best outcomes. Permit the color coat to dry thoroughly (about an hour).

Sarah Greenman

I placed cardboard beneath the seats because I was painting on a soft grass surface.

Sarah Greenman

4. I love the appearance of high-gloss painted furniture, so I finished the task with a polyurethane topcoat. This sealed the timber and left a clean durable finish that allows me to easily wipe down the seats after mealtimes.

5. Permit the seats to dry thoroughly in the open air before bringing them indoors. I let mine dry immediately, but four to five hours should be sufficient time.

Sarah Greenman

Staining and Re-covering that the Seat Cushions

I like the look of script, so I chose this typographic cloth from Ikea. I coated five cushions using less than 3 yards of cloth. The cloth was too white for my own dining area, so I shifted the shade with a simple tea stain.

Sarah Greenman

1. Staining a bright white cloth with tea is a terrific way to give your upholstery a classic appearance. While the seats are drying, fill a bucket with warm water and steep 10 or more tea bags. Plunge the cloth into the tea and let it soak for 2 hours or longer. Stir it sometimes. The longer you let it steep, the darker the stain is going to be.

Sarah Greenman

2. Once the cloth has the desired pigmentation, then wring out the water and hang the cloth to dry or toss it in the dryer on medium until it’s thoroughly dry.

Sarah Greenman

3. Place the pillow on the cloth and cut it with scissors, leaving spacearound the edges to totally cover your cushions, such as the sides and a few inches of overlap underneath. I left 5 to 6 inches of extra fabric around the edges of the cushion.

Sarah Greenman

4. Fold the edges of the cloth, tucking under the rough edges. This will help keep your cloth from fraying and coming loose with time.

Hint: If your fabric has a design with a clear top and bottom, such as this script, be certain the layout is lined up properly. In this case, I placed the script to be readable when you’re confronting the chair.

Sarah Greenman

5. Using a staple gun, secure the border of the cloth to the bottom of the chair. I had the most success when I began with front lip of the chair. When the front is secure, pull the cloth taut across the top of the chair and secure the rear lip of the pillow, leaving the sides and corners free.

When managing the corners, I just pintucked the cloth and used a few extra staples to secure the overlapped areas. Staple the surfaces of the pillow smooth and last the cloth with your hand as you complete the job. Be sure the top of the pillow is smooth.

Sarah Greenman

6. Once the chair frames are completely dry, reattach the newly covered cushions using a drill or screwdriver.

Before Photo

Sarah Greenman

Here’s a look at the seats before and after.

Sarah Greenman

My refreshed dining place now appears prepared to host a tea party. Treating the white upholstery using a tea stain brought it more in accord with the off-white area rug and pendant lighting above the table.

Your turn: Share your dining chair makeover below!

See related

10 Great Ways to Use Kitchen Corners

If space around your house is feeling tight, take a second look in your corners. If or not a corner is vacant or there is a pile of stuff you’ve been meaning to clean it up, it might be ripe for a small redo.

There are ways to make the most of a corner in every room of the home. I’ll start with the kitchen now. Whether you’re planning a remodel or just searching for a tiny intervention, here are some smart tips for corners you may not have considered.

Lake Country Builders

Insert a sink. A window over the kitchen sink is a popular style move and helps the drudgery of doing dishes. Get twice as much view by planning a corner sink that allows you enjoy the sights out either side of your dwelling.

Not sure? Take a Look at This ideabook: Can Be a Kitchen Corner Sink Right for You?

Best & Company

Make an Granite kitchen using a banquette. A small kitchen table and corner banquette maximize the chairs possible in a tight kitchen.

Allen Construction

Install a range. This is not a move for everybody, as it can take up additional space. What is great about it is the way it can work inside the work triangle, that it enlivens a corner and that it opens up the chance to display a special high backsplash.

Because this appearance grows more popular in the U.S., more corner-ready hood vents and ranges are making their way over from different countries, where it is already an established appearance.

Dalia Kitchen Design

Talk with your kitchen designer, builder and cupboard designers about placing a corner range. Unless you’re incredibly talented with DIY jobs, a corner range can cause some headaches. Some issues you’ll need to consider:

• Venting and how the port hood will fit in the corner
• Extra fillers next to the cabinets — doors and drawers will need to clean the oven when open.
• Look closely at handles whenever you’re opting for a range for a corner and realize that the oven’s manage may stick out beyond your cabinet fronts.
• Make sure that you have appropriate clearance to the toaster door when it is open — you can’t have it bonking in an island when it is only partly open. Also, think about attempting to hoist a hefty dish from it and see whether you have sufficient space to do this in front of the open doorway, or if you’re able to manage grabbing things from the sides.
• The corner range design works best with counters on either side.

Julie Williams Design

In this open-space program, everything is oriented toward the corner specifically, the view in the pub. Putting the range and vent hood in this corner creates a focal point where the backsplash extends all of the way up to the ceiling.

Renewal Design-Build

Have a cabinet and a window match. This is an example of smart kitchen planning; the glass-front cabinets nestle to the narrow area between the window and the adjacent wall. Make sure that you are leaving enough clearance to the cabinet door to open at least 90 degrees; factor in protruding knobs, moldings and windowsills.

The Closet Works, Inc..

Use a tall lazy Susan in the pantry. Long a favourite way to address deep corners, this is a fantastic storage solution for those of you using a pantry.

Glenvale Kitchens

Discover the brand new corner drawers. Talking of lazy Susans, a modern replacement is a profound, clever drawer that goes around the bend.

Screen special wares. A tower similar to this one can show off special serving pieces, cookbooks and plants.

Mary Prince Photography

Create family central with a miniature office. This kitchen workspace makes the most of a small corner, with upper and lower cabinets for storage and a computer for running the family. Note the thoughtful undercabinet lighting.

A set such as this makes for a great area to do homework, look up recipes, pay bills and keep track of the family program.

Sarah Barnard Design

Here is an example of a more stripped-down kitchen workplace, with just enough space to utilize and store a laptop or a iPad.

Check out more kitchen desk setups with style

Jeneration Interiors

Make an extra seating nook. Many people have a tendency to shove closets in every available space in kitchen. I have found I will pare down my belongings to fit in a small number of cabinets, and I’ll expand them to fill up a large number. If you have a look at what you really need and edit, you might free up room for a comfy corner seat.

Use shelves. This spacious appearance does not demand any special custom made corner pieces and makes a small kitchen seem larger than it truly is. The sole drawback is dust — I recommend using pieces you use and clean all of the time, and giving the shelves a dusting once weekly. This sounds like a pain till you find the magic of a duster with an extender, which will help you get the pesky dusting performed in a under a minute without a step stool.

See related

Fantasy Room Makeover Progress Report

It is a fantastic time to check in on the house of our Dream Living Room Sweepstakes winner. A couple of months ago, Mary Pucul of Vandling, Pennsylvania, won $20,000 of style services and $20,000 of furniture from Design Within Reach. (Check out our very first setup, where you will meet with the winner, husband Carl and designer Ani Semerjian, plus have a furniture shopping excursion together and take a look at the plans.)

The living room is well on its way to being a dream come true, but it’s an active construction zone. “It is a little difficult not having access to the place where we invest most of our time, and all the stuff that was in that room is spread out throughout the remainder of the home,” Pucul states. “But it’s all worth it, due to being here each day you can see things continuously shifting.”

Here is a peek at the way the room is coming along.

The dark brown cut the beams, moldings and stairs is painted in Benjamin Moore’s French Press AF-170. The light walls are Benjamin Moore’s Cosmopolitan CSP-100.

Semerjian Interiors

Semerjian’s original plan for the room indicates some of the furniture choices from Design Within Reach. (Read more about the purchasing and selection process here.) Besides the design furniture and services, the remodel includes tiling, a new ceiling, recessed lighting, painting, removing a sink inside the room (previously a kitchen) and shutting up the pipes.

Living in a construction zone isn’t fun, however, the couple has found ways to accommodate. Pucul is great at turning negatives into positives. “My husband went to the library, where you can purchase a bag of used books for $5, and he’s now on his next luggage,” she states. “We’ve been reading a lot. The radio, CD player and DVD player have been disconnected for the last couple of months, so we’ve had more discussions. I have tried cleaning the rest of the home, however, also the sawdust and plaster dust finds its way upstairs virtually every day, so I have given cleaning up until the work is completed — that’s a fantastic thing.”

At one stage during construction, Carl found a way to enjoy his favorite TV-watching place, that has a new wall-mounted plasma TV and a comfy lawn chair that could stand up to drywall dust. “Our only other TV is in the bedroom, so some nights we are in bed by 8 or 9 o’clock,” Pucul states.

Demolition comprised removing the drop ceiling and the rug. This brought back memories for Pucul, who grew up in this home. “After taking out the rug, we were left with all the linoleum from the time when that room was our family,” she states.

“Back in 1964 my mother won an electrical stove and informed my father the new stove was moving in the living room on the second floor,” she recalls, “so that was our kitchen got moved upstairs and the kitchen became the family room. Seeing that linoleum brought back a great deal of great memories … but I have to say, the hardwood floor looks a ton better.”

Semerjian’s programs include a white painted tongue and groove ceiling and recessed lighting. “The initial ceiling was half acoustic tile, and another half has been wood-grained paneling that looked very obsolete,” she states. “Instead of removing it, I chose to add it to another part of the ceiling, removing the acoustic tile.”

“Since the home is in the nation and the furniture is so contemporary, the tongue and groove ceiling introduced a nation element to the space. It will help tie the room together,” Semerjian states. “painting the paneling white upgraded the space and added dimension and interest to the ceiling.”

Ceiling paint: White Dove OC-17, Benjamin Moore

“I really like the appearance of dark molding and trim,” Semerjian continues. “I picked the dark paint help tie the ceiling and the flooring together, because we decided to opt for a gorgeous dark walnut floor.”

“I was not sure about the colour scheme initially but trusted Ani’s judgment,” Pucul states, “and she’s been put on!”

The flooring is an engineered timber by Mohawk. It is the Queenstown (a 5-inch-wide plank) in Hickory Antique. As this space is a cellar, Semerjian chose engineered flooring for their stability and resistance to moisture. “We chose to proceed with the dark floor because it’s much more wealthy and elegant, and I really like the appearance of wide plank flooring.”

The firebox was arranged prior to Semerjian came onboard, so she is working on a design for a surround to deliver it in the new scheme of the room.

Semerjian took good advantage of the space under the stairs to make open shelves for networking gear.

The owners like seeing progress almost daily. “We’ve come a long way,” Pucul states.

Our next article will be the big reveal. I can not wait to see this dream living room!

More: Watch the first installation of this makeover

See related

Fantastic Design Plant: Paperbark Maple

Suited to small gardens but both at home in bigger landscapes, the paperbark maple is guaranteed to be a favorite feature in your garden.

Le jardinet

Botanical name: Acer griseum
Common title: Paperbark maple
USDA zones: 4 to 2 (find your zone)
Water necessity: Water frequently until recognized
Light requirement: Full sun to partial shade
Mature size: 18 feet tall and 15 feet wide
Benefits and tolerances: Tolerates both clay and sandy land; no pruning is necessary
Seasonal interest: Year-round
When to plant: Preferably in spring or autumn; I’ve successfully implanted this in August with daily irrigation.

Le jardinet

Distinguishing attributes.
Striking cinnamon-colored exfoliating barkBeautiful fall color

Le jardinet

How to use it. Play off the rich bark color by surrounding this maple with foliage and flowers in sunset colors of gold, orange and burgundy.

Orange montbretia (Crocosmia) seem beautiful exploding from the foundation — even their seed heads form an exciting venture, as seen here.

Avoid obscuring the shrub with evergreen plants. Its bark is one of the highlights of the winter landscape.

Le jardinet

Think about the backdrop where the tree is seen. In this picture the warm cedar shingles are a perfect foil for the autumn foliage and bark.

Planting notes.
Dig a hole as deep as the root ball and twice as wide. Amend the soil you have removed with about 20 percent well-rotted compost.Add some bonemeal into the planting hole and mix it this boosts root growth.Add the tree into the hole and backfill cautiously tamping down gently.Water thoroughly.If you are feeling staking is necessary, make sure to allow some motion — this really helps encourage more powerful roots.Keep the tree well watered for the first two decades; after that water during prolonged dry spells.

See related

Great Design Plant: Pansy

There are few flowers more charming than the pansy. Yes, it is one of these blooms that you used to see in your grandma’s garden, but there is a reason for its longstanding allure. Its sunny, cheerful face, combined with low maintenance and a vast range of colours, makes it a traditional choice for cooler-weather gardening. Even though pansies will grow in almost any zone, they are a great choice for gardeners in the South that wish to supply a drenched spectacle in their autumn and winter gardens.

Sherri Fitzgerald – Ultimate Decor

Botanical name: Viola
Common title: Pansy
USDA zones: 7 to 11 throughout the winter; 6 and lower throughout the summer (find your zone); could overwinter in colder climates after well established.
Water necessity: Consistently moist soil
Light requirement: Full to partial sun
Mature size: Up to 9 inches tall and wide
advantages and tolerances: Nonstop blooming and strong colour in the garden
Seasonal attention:Dependably blooms throughout two seasons
When to plant: Fall for southern climates, spring for northern climates.

J. Peterson Garden Design

Distinguishing traits. Pansies have one of three basic colour patterns — one solid, clear colour; a solid colour with black “pen” markings radiating in the centre; or solid colour with a dark centre. Colors include purple, yellow, lavender, russet, orange, white, red and even black. Some varieties, particularly the blue and yellow ones, possess a subtle scent that is quite noticeable in the early morning or at dusk.

J. Peterson Garden Design

How to utilize it. Pansies are unstoppable bloomers in front of a mixed-perennial or annual bed, as well as features in container plantings.

Use one colour or variety for the maximum impact, or choose two different colours and plant in masses or cubes. Employing a high number of different colours will water down the overall impact. Both the leaves and flowers of pansies are edible, perfect for garnishes or for making syrups, flavored salads or honey.

Pair pansies with dusty miller (Senecio cineraria), viola (Viola), English dais (Bellis perennis), sweet alyssum (Lobularia maritima) and snapdragon (Antirrhinum majus).

Westover Landscape Design, Inc..

Planting notes. Plant pansies in a sunny place — they will tolerate some light shade but may become leggy and unattractive if they’re grown in darker colour. Ensure that your soil is loose and well drained, and simmer monthly with a nitrate-based plant food to get larger and more profuse blooms. Maintain your pansies consistently moist for optimal health and best results.

More:
Bright Plants for Flower Beds That Wow

See related

Kitchen of the Week: A Lease Kitchen That Moonlights

Andy Sermonia is one of those rare tenants with a great kitchen, which includes ample wood cabinets, granite counters and a granite counter. But prepping and photographing dishes for Sermonia’s blog still may be a struggle when she is working with a lot of ingredients. The photographer and mom maneuvers just like a whirlwind, making the most of her San Mateo, California, kitchen by finding new storage tricks and keeping her counter space clear and clean.

Cooking for the her website and her family may get complex in this layout, but the ample cabinetry helps keep things up and away from the counters.

Magnetized items keep must-haves neat. Magnetic spice holders and notepads — such as those on the side of the fridge at the far right of the photo — help Sermonia remain organized. “Laptops are really crucial for my recipes,” she says. “I always have one at the kitchen.”

Q. What’s one thing you enjoy on your kitchen?
A. It’s a lot of storage. I am able to hide away kitchen equipment easily, which is important to mepersonally, because I enjoy using a great deal of countertop space to work with.

Cabinets are organized carefully by task and types of items. Keeping items helps to keep counters clear and the kitchen looking spick-and-span. Any additional counter space may be used to dress things up with practical and pretty kitchen accessories.

To maintain her cabinets additional arranged, Andy often makes use of simple white hooks which may be attached with tape. “It’s definitely helped me with regards to storage, and it is great for tenants with landlords which don’t allow drilling from the walls.”

Q. What’s one storage or space-saving secret you have learned from your kitchen?
A. Keep everything close by — not they aren’t yet! Have everything categorized; this way, looking for things you need becomes easier.

Sermonia’s hardwood flooring make cleanup a snap. Since she elevates, she didn’t choose her kitchen finishes, but her all-white kitchen accessories and dishes produce brightness and goodwill.

Q. What are three of your kitchen comforts or accessories which you love?
A. Definitely the food processor — I use it a whole lot to prep; the mixer to get when I inhale pastries; and the oven.

Sermonia shoots the majority of the stuff for her website and portfolio in a little place right next to the kitchen. A little table with black and white backgrounds nearby helps her get the most from her house’s natural light.

Q. What’s one thing you aspire to modify in your kitchen in the not too distant future?
A.Since we are just renting, I’m learning more and more what I actually want in a kitchen. Absolutely lots of space, larger cabinets and a very big pantry! An island would be fine also. And since I’m 80% photographer and 20 percent cook, I really need large windows to allow a good deal of natural lighting in to picture my small kitchen experiments.

Straightforward, crowd-pleasing pasta dishes are one of Sermonia’s favourite things to whip up for a dinner party. This creamy mushroom pasta is a staple in her home and may be put together with nominal cookware and ingredients.

Q. What’s your go-to dish for a dinner party at your house, and why?
A.Almost anything Filipino. I grew up eating Filipino food and have watched my mom, father, aunts, uncles and grandmas cook it. It was something that came naturally and still does. And then there’s pasta! It’s simple, and everybody likes it.

Like most food-loving tenants, Sermonia dreams of the day when she could have a new kitchen exactly to her liking. “The best advice I could give is to make sure to always clean your kitchen and clean outside the countertops as much as possible,” she says. “The things on these, the better.”

See related

Southeast Gardener's September Checklist

With atmosphere, creating a feeling of excitement and a scent, September opens with the dog days of summer . The source of this excitement might be no other reason than the weather being bearable enough to spend some time outdoors once more.

Reds dominate. Yellows generate. Purples empower. Grasses sway, with flowers. Themselves steady because they feed on seeds. Box turtles mosey around the tomatoes, eating what the birds or deer knocked to the ground. Life abounds. September was made for sitting on the terrace.

Gardening with Confidence®

Strawberry wants. If you did not fertilize your berries in August, do this in September. For plants that were planted this past spring, apply 4 to 6 oz of ammonium nitrate (33 percent nitrogen) or 12 to 18 ounces of 10-10-10 for each 25 feet of a row.

For plants in their next year of expansion, increase the application rate to 6 to 8 oz of ammonium nitrate or 18 to 24 ounces of 10-10-10 for each 25 feet of row.

Spread the fertilizer uniformly at a band over the row, about 14 inches wide. Apply when the foliage is dry. Brush the fertilizer off the leaves to avoid leaf burn.

In cases like mine, where the berries are not planted in rows but rather as a backyard boundary, just estimate the square footage and apply the equivalent quantity of fertilizer. My strawberry border is 2 1/2 feet wide by 10 feet long, which is equivalent to 25 feet of rows.

Gardening with Confidence®

September (and August) is when the cell size of next spring’s strawberry buds is determined. The more positive the growing conditions that your berries receive the bigger the berries will be next year.

Ensure your berries have 1 inch of water each week. If nature doesn’t provide this, then plan to supplement with water from the spigot, rain or well harvester.

Gardening with Confidence®

Wait to prune shrubs. Fight the urge to prune shrubs that seem overgrown after a lengthy summer revealing. It is best to wait until late spring to prune, before the next growing season starts.

Pruning today could spark new growth that could be too tender to endure an early deep freeze. You could also be cutting off following spring’s blooms, like azaleas and camellias.

Gardening with Confidence®

Prune roses. Fear of trimming the next year’s bloom is not a worry with roses, but it’s still best to wait until March.

Knock Out roses can be pruned any time, however, particularly once you want to shape the shrub. All sorts of roses benefit from elimination of diseased canes and leaves in almost any season.

Gardening with Confidence®

Fall planting. October is a great time to plant or go a tree or shrub. To search for one that will do well in your area, visit the local garden centre this month while the choice is at its peak.

Remember to dig a planting hole no deeper than the root ball height, and excavate the hole two to three times the width of the root ball diameter.

Gardening with Confidence®

Lawns. The first two weeks in September are the best times to reseed cool-season grasses, such as Kentucky Bluegrass, Tall Fescue or even Turf-Type Fescue. Additionally our gardens will profit from a core aeration.

Gardening with Confidence®

Feed hummingbirds. Hummingbird feeders are not necessary if you have enough plants to nourish these people, but they are a great way to ensure you get a consistent food supply for the hummers. It’s possible to place the feeder at a place that is easy to view from your favourite seat, indoors or out.

Gardening with Confidence®

Make your own hummingbird nectar. Making sugar water nectar to fill your feeder is easy to do and takes less than a minute. Boil four parts water with one part sugar. Decrease the heat as soon as the sugar dissolves.

Allow the sugar-water mixture cool, fill out the feeder. Store any remaining nectar in the refrigerator for up to a week. When temperatures are hot, greater than 86º F, then alter the nectar water daily.

Gardening with Confidence®

Weeds. There never seems to be only 1 bud; they arrive in multiples and just like to hang gangs. You will find the sedges, the spurges, the grasses and the oxalis. There are too just many to mention and still hope for a happy day.

Stay ahead of your weeds. If you have a issue with poa annua, annual blue grass, like I do in my Raleigh backyard, today (early September) is the opportunity to utilize a pre-emergent like corn gluten.

Watch more ways to combat weeds

Gardening with Confidence®

Pests. Should you discover fall webworms in your own trees — hickory, walnut, birch, cherry and crabapple, to mention a few — pull them out and dump the caterpillars into a bucket of soapy water. This is a control measure for those planters within reach.

For those nests that are not within reach, you might need to resort to spraying. Control webworms with BTK (Bacillus thuringiensis). Apply just to the affected branches; utilizing BTK as a wide spray will hurt beneficial insects as well.

More:
Planting guides for your Southeast backyard
Browse flowers, plants and garden design ideas

See related