Category: Gardening and Landscaping

How to Redo Landscaping

Your landscape will be the introduction to your home. You can make your home more inviting, more appealing, and include curb appeal by redoing the front yard. In the backyard you’ll be able to make a usable space for what your family likes best, whether that’s volleyball, vegetable gardening or entertaining. Careful planning and a step by step procedure will make the renovation of this landscape a fun procedure.

Assess the website. Create a scale drawing of the yard. Determine what components of the present landscape meet your needs and will be kept. Decide what has to be added so that the landscape is more appealing and usable.

Remove elements which won’t be part of this new landscape. Hire professionals to remove large trees and re-route electric wire and pipes, if needed. Stockpile items that will be re-used close to the site of their new use.

Remove irrigation pipes and level the soil under fresh patios or constructions. Construct hardscapes, including walls, patios, paths and constructions. Install new plumbing, wiring and underground irrigation pipes. Start at the most often used places and continue out there to less used areas.

Lay out the borders of flower or vegetable beds and put in edging. Spread 2 to 3 inches of compost or aged manure over the soil and till it in.

Plant trees, shrubs and other big or slow growing plants that will provide the construction of this landscape. Consider the mature size of each plant and allow enough distance, including overhead. Avoid very large trees which will overpower the scale of the existing landscape and home.

Put in the drip irrigation system, rainwater harvesting system and greywater system, if you will be utilizing them. Coordinate systems so that both new and existing plants will be adequately watered.

Amend the soil where you’ll be planting lawns or groundcover. Use the process described for flowerbeds. Plant the lawn or groundcover.

Plant vegetables and flowers at the right season. Mulch the mattresses.

See related

The way to Decorate an Outdoor Brick Retaining Wall

Outside brick retaining walls add some design or an official look to landscaping. In case a brick retaining wall is extended, however, it may tend to look bare or plain. Spice up the wall and then give it more appeal by decorating it. Many options aside from the normal paint project can add character and texture to a brick retaining wall, such as plants and wall hangings.

Create a planting bed in the bottom of the brick retaining wall, and add shrubs or smaller trees to the bed. They’ll split the wall’s plain surface. If no soil is under the wall, as is true for a wall that is against a drive, then add narrow, decorative planters and build plants inside them.

Attach a decorative-styled trellis to the brick retaining wall with masonry screws. Plant climbing vines like ivy or climbing roses in the wall’s base, and enable the plants to cover the trellis. Using a decorative-styled trellis ensures that the wall nevertheless will have some interest if the vines die back in cool weather.

Hang decorative wall hangings on the wall, like wrought-iron designed bits, antique garden tools or glassware. The things to choose is dependent on the style of the surrounding landscaping, which is anything from coastal or rustic to Victorian.

Place potted plants in addition to the wall to draw eyes up and to keep guests from seeing a simple, plain wall. If needed, use plants that tend to spill over their pots, like creeping zinnias (Sanvitalia procumbens), therefore they develop down above the wall, breaking up the straight line of the wall’s top. Creeping zinnias, which can be annuals, work well in U.S. Department of Agriculture plant hardiness zones 6 through 9 but may also develop to some degree in most zones.

Add decorative lighting to the wall. If possible, connect the lights to an electric source so that you can control them readily. If electricity isn’t available, use solar-powered lighting. Attach the lights to the wall, or place them across the wall’s top ledge. Include plants involving the lights for an interesting impact.

See related

The best way to Landscape Tall Shrubs that may Be Potted

Landscaping tall shrubs in pots lends an ease to your garden arrangements. Tall shrubs in pots are mobile, so that you can move them readily to define spaces and make displays. Use tall shrubs in pots to hide pool equipment, fence building or a part of your garden that’s under repair. Move the pots to separate a seating area from a children’s play area or vegetable garden. Use tall hardwood shrubs based on your height need and garden light to ensure they thrive on your mobile landscape for multiple seasons.

Make an 8-foot-tall screen that bursts with bronze color and ages to deep green using Fraser’s Photinia (Photinia x fraseri). Move the container to full sun and water per week to guarantee the containerized shrub thrives in U.S. Department of Agriculture plant hardiness zones 7 through 9.

Use Black Bamboo (Phyllostachys nigra) for a very tall screen, 10 to 15 feet in height, which turns drastically black when stems age into their second season. Move the containerized bamboo to multiple areas of your garden, as black bamboo tolerates full sun to partial shade light states in USDA zones 7 through 11. Water on a standard program, either weekly or more frequently as required.

Plant Japanese laurel (Aucuba japonica) to get a hardy tall shrub that grows up to ten feet tall and provides interesting foliage. Move Japanese laurel into shaded areas, as it adapts well to low light. Water as required, although this laurel adapts well to irregular watering and dry soil in USDA zones 6 through 10.

Use Spanish dagger (Yucca gloriosa) within a architectural screen, offering a stunning 6-to-10-foot-tall backdrop in full sunlight spots which emphasize its sword-shaped leaves against a fence or close a patio. Its leaves are smooth at the border, so don’t pose a hazard if brushed against. Keep Spanish dagger comparatively dry, watering only as required in USDA zones 7 through 10.

See related

The way to Make Your Front Yard Attractive

Your front yard is the first thing visitors and passersby visit, so you want to generate a positive impression. Dying grass, litter and unkempt landscaping are just a few problems that push down the curb appeal of the yard. Once any problems are fixed, you can add landscape features, like planting beds, to boost the visual appeal of the outdoor location. Your front lawn upgrades can boost the value of the property, besides satisfying your neighbors.

Check with your homeowners association should you live in a neighborhood with you to find out what it is that you’re allowed to do on your front yard. These governing bodies frequently limit what you could change or grow outdoors.

Place the eyesores from the yard by walking across the road to get a different view. Notice which areas stand out as unattractive. Focus on those areas when enhancing the overall look of the front yard.

Renovate your lawn by becoming a regular care routine of irrigating and mowing. Replace dead patches with grass seed or pieces of sod. Overseed your lawn when the bud growth is patchy. A green lawn makes the front room more appealing.

Trim overgrown bushes and plants in the front yard. Clean up any lawn debris, like leaves or twigs.

Fix and clean existing landscaping characteristics in the front yard. Power wash fences, retaining walls and brick around the house. Repaint fences, planters and other constructions that are peeling or obsolete.

Plant blooms, ornamental grasses and shrubs that match the architecture of the house. For instance, choose plants that are conventional, like evergreens and roses, for a Colonial-style residence. Pick less organized, flowing plants, like ornamental grass and lavender, to get a cottage-style residence.

See related

How to Burn Wood in Outdoor Fireplaces

There is nothing more inviting on a cool fall or winter night than sitting with a roaring outdoor fireplace enjoying warm beverage or roasted marshmallows. Built from a number of materials, including stone and metal, outdoor fireplaces and are cared for and maintained in much the exact same way as a classic indoor model. Before lighting a blaze in your outdoor fireplace, then give it a good once over before correctly stacking the logs and light a match.

Inspect the fireplace to get cracks or creatures that may have called it home. Mend a brick fireplace using mortar and allow the item to dry according to the package directions prior to building a fire. Allow a professional to repair your metal model. Whether there are any creatures that have taken up home in your outdoor fireplace, then get in touch with the animal control agency to remove and relocate the animal.

Cover the bottom of your outdoor fireplace having a 1- to 2-inch layer of sand or ash. Both products help keep the flame and cut down on the demand for additional wood after on.

Set a larger log, or one that is at least 8-to-10 inches in diameter, against the back of the fireplace, with a tiny log on top of it. Just use dry, seasoned wood and never attempt to burn treated wood in almost any fireplace, like an exterior model.

Put a smaller, 4- to 6-inch log directly before the larger log in the back. Gently press both logs into the ash to aid them burn more.

Fill in the gaps between the smaller and larger log with crumpled-up paper and small pieces of wood and branches, or kindling. Light the branches and paper with a match or lighter.

Monitor the fire and add more kindling when required. For added protection, slip on a pair of insulated leather gloves while adding paper or wood to the fire.

Extinguish the fire by covering it with sand or ash. Never walk away from a burning fire or just dump the sand or ash on and assume it’s out. The fire is out when no embers are burning, so don’t leave until you are sure there’s not any prospect of this reigniting.

Wash out the ash before the next usage. Wait at least 24 hours following your final fire before scooping up the ash and any other remnants of your final blaze.

See related

Ideas for Flower Containers for Shaded Entrances

Potted flowers brighten shaded entrances and welcome guests with refreshing colour or scent. Portable containers may be removed easily after a flowering show finishes, and permanent planters hold seasonal colour according to your preferences and whims. Shade-tolerant shrubs, perennials, vines or yearly flowers can fill pots, hanging baskets or urns with individual specimens or in stunning seasonal combinations. Arrange to get a steady water supply to keep your container garden perky since containers tend to dry out quickly.

Flowering Shrubs

Obviously modest, container-grown Japanese maple trees (Acer palmatum), for U.S. Department of Agriculture plant hardiness zones 3 through 9, retain their diminutive height over several phases. Heavy pots that are 2 or 3 inches wider than the root ball and wider than they are heavy work best for slow growing, weeping varieties, like “Red Dragon.” Spring blooms and extravagantly colored leaf make for year-long interest. Rhododendrons and azaleas (Rhododendron spp.) , for USDA zones 4 through 9, come in every flowering shade except true blue. Plants vary from under two feet tall into towering, 20-foot-high giants, but the small and medium ranges bring reliable spring shade to shaded entryways. Move off-season “rhodies” out of sight or plant them in permanent garden places to make room for summertime entryway shade.

Perennial Flowers

Pots restrict the vigorous development of fragrant, tropical ginger lilies (Hedychium spp.) , which can be most attractive from the moist, coastal areas of USDA zones 8b through 11. In late summer through early fall, bring spectacular, 3- to 7-foot-high potted butterfly ginger (H. coronarium) seeds into the entryway because of their 12-inch-long clusters of fragrant white blossoms to welcome guests. Try grouping different-sized pots together with a variety of colorful flowering perennials. Trailing tuberous begonias (Begonia), for USDA zones 6 through 9, overflow pots with brilliant summertime shade. At USDA zones 5 through 9, hardy cyclamen (Cyclamen hederifolium) plants bloom in early fall with pink or white winged flowers one of silvery green, heart-shaped leaves. Lenten rose (Helleborus orientalis), for USDA zones 4 through 9, blossom in winter with colour choices in pink, white and plum shades. Consider including colorful, spiky, 18-inch-high “Red Baron” blood grass (Imperata cylindrica) for textural contrast.

Flowering Vines

Permit perennial vines spill from hanging baskets, window boxes, wall containers or tall urns in nesting entrances. The evergreen bleeding glorybower (Clerodendrum thomsoniae) graces entryways in USDA zones 9 and 10 with showy red and white flower clusters from summer through fall. The intoxicating scent of Chilean jasmine’s (Mandevilla suaveolens) whitened to blushed-pink blossom clusters welcome guests from late spring through midsummer in USDA zones 9 and 10 or within an annual everywhere. Charming orange, white or yellow cedar trumpet flowers marked with dark-chocolate-colored center dots cover black-eyed Susan (Thunbergia alata) vines in summer as an annual or in perennial pots in USDA zone 10. For striking entry shows, install classes of hanging baskets at different speeds with mixed or matched flowering vines.

Annual Flowers

Annual wax begonias (Begonia spp.) , with succulent foliage, flower in red, pink or white from summer through frost on shrubby plants beneath a feet tall and broad. Tropical coleus (Solenostemon) plants blossom with alluring blue flower spikes, but since their real glory is in their brilliant leaf, pinch flowers right back for dense, bushy growth. The crops grow 2 feet tall and broad and match mixed flowerpots or hanging baskets, leading velvety leaves splotched with vibrant reds, greens, pinks, oranges and yellows. Low-growing impatiens (Impatiens walleriana) cover themselves with masses of all 2-inch-wide spurred blooms in shades of pink, red, white or peach from spring through frost. Pansies (Viola cornuta) bring winter and spring cheer to nesting containers with their smiling “faces .” Edge a big perennial flowering tub with dark begonias, coleus, impatiens or pansies.

See related

The Way to Look Good From Any Angle (the Garden Edition)

Many professional versions are photographed from one angle, their best side. A truly beautiful model, however, will look great from any angle. Similarly, a number of our gardens were created, usually unintentionally, to look good from one vantage point. If it’s a front lawn, that vantage point is traditionally the street. If it’s a backyard, that spot is most likely the back door, patio or deck. We all have spots in our gardens that leave us less than satisfied, needing more. At some stage it’s time for a makeover.

Many years back I got a question from a homeowner having an undeveloped backyard that sloped radically toward the lake. The challenging thing about this project was that the backyard was seen from a number of different angles. There were just two loggias, one on the first floor and one on the second, and a view toward the home from the lake, and ultimately, a view from a sidewalk. Then there were the bull.

How was I to process all of this to a gorgeous, cohesive strategy? Perhaps your space is not this complicated but you know deep within that you have not yet tapped to its full potential. Here’s help in creating a garden area that looks good from any angle.

Huettl Landscape Architecture

Vary the heights. Engaging a dominant third dimension in your garden is a good way to add interest. Notice the heights of the planar surfaces here. This garden would shed much of its interest if all of the surfaces were on the exact same degree. It is strong enough today to command attention when seen from any angle.

D-CRAIN Design and Construction

Let’s think about this remarkable three-dimensional courtyard. The varying heights of the Cor-Ten steel planters add immeasurable interest. The reduced wooden decking, juxtaposed with the steel, provides continuity in color when adding textural interest. The upright sort of the succulents mimics the support beams on the home.

Gregory Lombardi Design

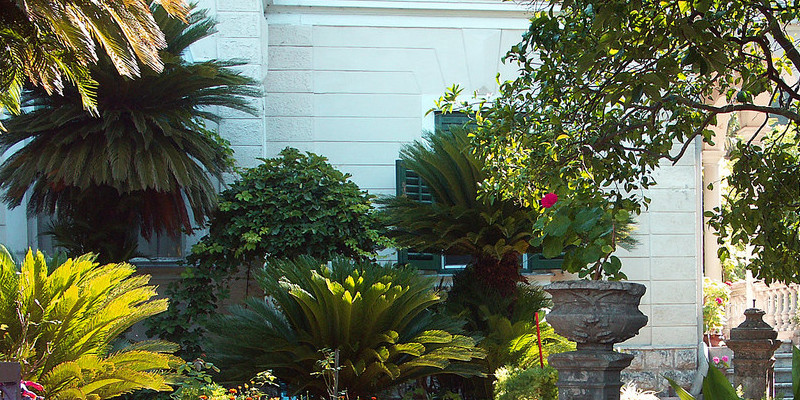
Add artwork. Another way to add multilevel interest would be to use appropriate artwork. This stone medallion is a centerpiece that looks great from any angle. If you are thinking about sculpture, make sure that its form and dimensions make a statement from every vantage point. A tall, thin sculpture, for example, would most likely look underscale and improper seen from above.

Adam Woodruff + Associates, Garden Artisans

Plant en masse. Now that we’ve discussed hardscaping, let us proceed to planting approaches. Mass plantings of the exact same or similar crops will most certainly have a positive influence in your garden when seen from above or at ground level.

Notice the gorgeous number of clumping and upright plants at the prairie-style garden here. An incredible amount of interest is produced on account of the appropriate and artistic usage of texture, shape and color. The serpentine hardscaping lines make a daring yet relaxing statement from ground level and would take on an artistic flair if seen from above.

PC Landscape Architects & Associates, Clinton

Mix textures and materials. The plan of the garden is relaxing and constant whilst including a variety of decorative grasses and Russian sage (Perovskia atriplicifolia, zones 4 to 9). The similarity of form and wide range of substance create cohesion and interest. With its serpentine bed lines, the garden pulls the eye through the space from every angle.

Arterra Landscape Architects

3 Garden Case Studies

1. The boardwalk that is metropolitan.
This urban backyard is stuffed with interest from every viewpoint. Running the boardwalk at a diagonal to the fence has created unexpected interest that brings the attention and engages the viewer.

Arterra Landscape Architects

The identical garden is arguably much more interesting at ground level. The boardwalk brings the eye through the space, enticing the viewer to experience each vista. The mass plantings of blossoms from side to side bring much-needed softness and goodwill to this contemporary garden. The planar surfaces create the illusion of spaciousness.

Jay Sifford Garden Design

2. The woodland path. I live on a really wooded lot, together with front yard receiving the majority of the sunlight. My deck wraps around the front of my property, so this garden space is seen from the street, the lawn back toward the street and looking down from the deck.

I wanted a usable front lawn, so I made a serpentine, wider-than-normal pathway to a stacked-stone seating wall. Strong route lines define both the space and its own purpose. Because this garden was a clearing in the forest, I made the trail very wide; this damaging space allowed me to overflow the beds without making the space seem or feel overly busy. A narrower route would have felt immortal. Since the garden is casual by layout, I utilized repurposed railroad ties and gravel to split out terraces to provide the guest places to linger and revel in the space.

Repetition is a really useful concept to help a space sense homogenous and familiar. Here I used Japanese maples and chartreuse foliage across the pathway to create continuity.

Jay Sifford Garden Design

This second view is looking from the seating wall back toward the street. The challenge here would be to conceal views of the street and neighboring homes, since I wanted to get a level of solitude.

As I planted my trees and larger shrubs, I made sure they were just placed to conceal as lots of the undesirable viewpoints as possible. When siting trees and trees, always look at them from multiple viewpoints. Occasionally moving a plant 6 inches can make an immeasurable difference in the overall sense of a garden.

Jay Sifford Garden Design

The next view is looking down from the deck. Prominent lines specify the space, carving out a bold presence in the midst of the forest. With no lines that are notable, the space would uneventfully fade to the woodlands. Pops of chartreuse accentuate the space and cross over the path, whilst burgundy and blue foliage both stand up to the chartreuse and calm down it just enough.

Jeffrey Gordon Smith Landscape Architecture

3. The rill. Strongly defined lines provide the interest that brings the eye toward the focal point. Notice how the urn in the middle of the water feature mirrors the color and shape of the flagstone. By supplying this continuity, the designer has created an informal yet organized area.

Jeffrey Gordon Smith Landscape Architecture

This garden works just as well from ground level, providing continuity from one garden room to another. The color of the hardscaping and the flow of water from a focal point to some other guarantee a relaxing garden experience.

See related

Bamboo Screens Make Your Garden Sparkle

Sunlight is scorching hot, and you also feel as if you are on-display. A pergola is not in the budget, and a privacy fence that is conventional is not actually what you are after. Additionally, you are in need of a remedy fairly fast. Have you ever considered a repair as easy as bamboo?

Because bamboo is this type of fast growing plant, it’s a renewable resource that is deemed green and eco friendly. Use it outside to produce fences, screens and ceilings. Below are samples of of the versatile stuff.

Yaniv Schwartz – Photographer

A bamboo roof is simply what this couch that is easygoing desired. The stuff and light and ethereal areas like this one effortlessly blend together, particularly since light can pass through.

Elad Gonen

There is no better stuff that may have been utilized for the ceiling of the outside room that is tropical. To put it simply, it really feels like heaven! I will consider a margarita on the rocks, please.

Ray Johannes Landscape Layout

When selecting a material for the fencing, capable to resist high winds and powerful sun, bamboo cane is an excellent choice. It is also accessible varying heights, which comes in useful when you’re choosing a barrier that is taller.

SchappacherWhite Architecture D.P.C.

Bamboo functions well here due to the cohesive experience it it generates. Drawing in the colour family of the seats and rock fireplace, this area feels nicely planned and well-balanced.

Ray Johannes Landscape Layout

Rolls of bamboo can be bought in equally gentle and darkish tones. This fencing was produced from the selection that was darker, though permits mild to filter through. In case you are trying to find something a tad bit more personal, bear this in your mind.

Atypical Typea

This creates a wonderful backdrop for the row of exuberant plants and gently coloured fence combines nicely with its environment.

HartmanBaldwin Layout/Develop

A Japanese-inspired room in this way wouldn’t be full without some sort of bamboo. The roof top is an excellent extension of the area interior and generates a sense of Zen and relaxation.

Hung these lengthy draping screens of bamboo, in the pergola make a personal gathering spot. Through using layering, the flower baskets that are big help total the appearance.

Elad Gonen

Used on the ceiling, bamboo meshes completely with all the heat of light and the furniture in this backyard retreat.

Elad Gonen

Demonstrating yet again that bamboo can match several fashions, the designer of the outside room that was modern-day utilized rolls of bamboo for the broad-crossing ceiling.

Barbara Cannizzaro

Maybe among my personal favorite outside rooms this appearance that was accumulated, to day is pulled together having a backcloth that is sheer enough to permit some filtered mild, however personal enough to develop an atmosphere of isolation.

In The Event That you are considering of including some bamboo to your property, here really are several on-line sources to get your began:
Bamboo and Tikis
Bamboo Fencer

Next: Mo-Re thoughts for designing your out-door areas