Author Archives: Selse1946

How to Re-Grout Ceramic Flooring

The grout between floor tiles can become unattractive because of chips, cracks, stains and grime that damage the appearance of your flooring. When the grout has deteriorated into a place that it can’t be restored by cleansing, recoloring or re-sealing, it is possible to revitalize your tiled ground by by eliminating the old grout and changing it with clean grout.

Remove outdated grout using a diamond- blade on the multi-tool that is oscillating. An multitool rented or may be bought from home and components facilities. These resources vibrate the blade at very high velocity to grind away the grout. Follow the lines in the tile, operating then and in the extended course in the path that is broad. Grind the grout down into a depth equivalent to at least half the thickness of the tile.

Chip away any grout remaining along corners and the edges of the tiles using a tiny and hammer chisel. Tap the chisel using the hammer to knock the components of of grout off. Take care itself. Brush away the items of of grout right into a dustpan. Clean the area with isopropyl alcohol. Before re-grouting replace any broken tiles.

Pour 1 cup of grouting compound to the tub that is little. Add water and stir together with the putty knife before the grout is a consistency also crumbly nor too soupy. Let the grout stir it before using it upon the tile and sit for 10 minutes. Stir every 10 minutes while grouting.

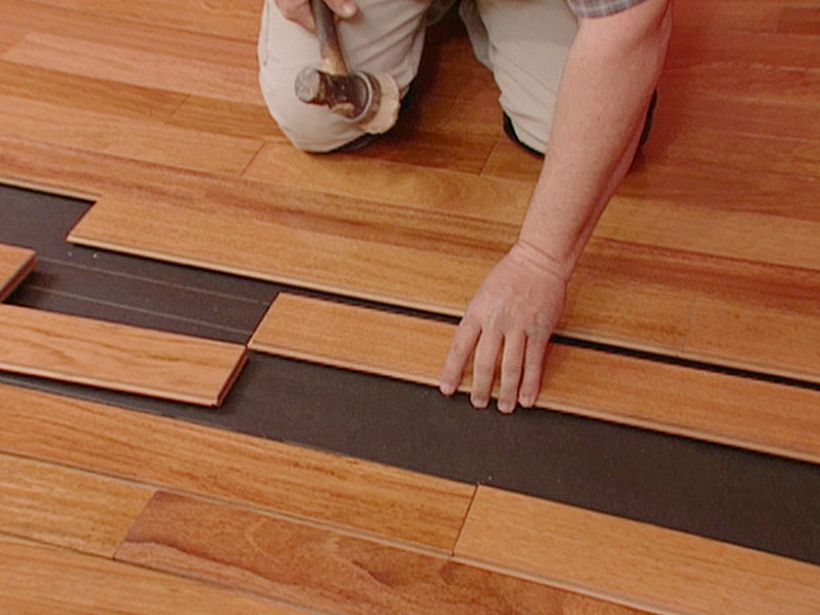
Force the grout into the joints between the tiles using the rubber grout float. Stroke the float over the diagonally from gouging the grout to keep. Use the float to eliminate excess grout in the tile surface. Work a little part in a time, covering an area it is possible to reach without walking over grout that is clean. Discard it, in the event the grout gets dry and blend another batch.

Allow the grout in the area that is freshly grouted to set for 1-5 minutes. Dampen a sponge and wipe excess grout. Wipe across each joint. Rinse the sponge frequently. Grout extra sections before the floor is completed. After finishing the last area wait a-T least 60minutes. Buff off any remaining grout haze from your tiled floor having a clear gentle fabric. Don’t walk-on the ground for 2 4 hrs.

See related

20 Important Home Heating Tips

Close to 40% of the energy consumption in the house goes to electricians Chico CA. More than 95% of this statistic accounts for non-renewable sources of heat. At the moment, there is an urgent need to protect the environment, especially by focusing on environment-friendly ways of generating energy in the homes and places of work.

We have prepared a list of tips below to help you in this process.

Increase Wall Insulation

Insulation is not an easy task. However, when done properly, it is an effective way of keeping your home habitable and maintaining a low bill. You should consider increasing insulation in the walls.

Increase Attic Insulation

For the attic, you must take some time and figure out what is sufficient and what is surplus to requirement. The Department of Energy has a guideline for each region, which can guide you on how much insulation you should add to the attic.

Use Recycled Insulation

There are cheaper and environment-friendly methods of improving insulation in your home. You can use old blue jeans or recycled paper. Blow the insulation material into the attic or walls. You just need to find one of the local companies that offer these services.

Find Drafts

It is easy to detect draft at home. Walk around the perimeter of the windows and door jambs on a windy day with a light string, a strand of hair or a lighter. If either of these is blown away, you have to consider proper insulation.

Seal All Drafts

If your draft problem is restricted to window frames and other immovable places, foam sealant or silicone caulking will work for you. In the case of movable items, weather stripping or rolling up a towel can also help.

Don’t Forget Pet Doors

You cannot easily avoid draft from the pet doors. However, you can install a heavy curtain on both sides of the door, or weather stripping. In case the pet door is close to a sliding glass door, it will also need weather stripping.

Take Advantage of Passive Solar Heating

During the low winter, you can use the position of the sun to keep your house warm. Just keep your curtains open during the day, especially for the windows facing west and south. Remember to remove the solar shade screens during this season.

Don’t Use Exhaust Fans

Exhaust fans are notorious for consuming a lot of the warm air in the house, especially when used continuously. Turn them off as soon as you can.

‘Reuse’ Oven Heat

You can use the heat in the oven to keep your kitchen warmer during the cold season. When you are done cooking, just leave the oven door open and the warm air will circulate.

Skip the Gas Fireplace

Central home Chico electricians is a better alternative to a gas fireplace. This is because gas fireplaces usually consume more energy.

Utilize the Wood Fireplace

A wood-burning stove or fireplace will generate more heat than your gas fireplace. Since you can burn scrap wood, it is also cheaper.

Reverse Your Ceiling Fans

Install fans that are designed for reverse operation during the winter. This mode prevents heat from dissipating through your walls or roof.

Keep the Temperature Steady

Make sure your temperatures are kept steady. By maintaining a steady range, the thermostat will not have to work overtime.

Keep the Thermostat Low

You can train your household to lower the temperature setting by 1-2 degrees every year. You should also find a comfortable range for the day and night temperature.

Acclimate

Try and maintain a steady temperature range in your car, so that your body does not have to struggle to acclimatize when you get home.

Dress for the Season

With the right clothes for the season, you will barely have to push your temperature limits irrespective of the prevailing weather conditions.

Consider a Space Heater

There are scenarios where it will be better to use a space heater, especially for small rooms, compared to the central heat system.

Stick to Warm Foods

Hot foods usually make the body feel warmer faster. Cold foods, on the other hand, tend to have a cooling effect, which lasts longer during the cold season.

Hang Curtains

Get heavy curtains during the cold season and hang them over your windows. Heavy curtains improve your insulation and trap more heat in the house.

Place Rugs in High-Traffic Areas

For the areas that experience a lot of traffic, get area rugs. This works well especially for hardwood floors and improves your insulation effort.

The best way to Heat an Room

Remodeling a dusty attic right into a area is a useful method entice potential customers and to enlarge a house usable square footage. The top-most part of a house can become cold during winter evenings that are cooler. Homeowners have a number of alternatives that are different to warm an attic space efficiently for the greatest comfort.

Tapping In To Present Central Heating

A common attic doesn’t ordinarily have have duct work supplying warmth from a central furnace method, however you can add a “T” joint in to current ducts close to the attic to produce a heating pathway. The joint doesn’t permit the current heating while permitting a part of the warmth to be partitioned off to the attic to stay in tact for the remaining home. Include a vent on the entrance and you or your builder wants to cut a hole in the wall of the attic where the duct ends. It’s good practice to include a thermostat that is multi-zone therefore the temperature of the attic is managed independently in the remaining house.

Baseboard Heaters

A attic area could be heated with baseboard heaters. Two heaters or one may be attached to the baseboards and attached to to a power outlet. Since heat rises, the the heat in the heaters rises up from the floor to the ceiling to heat the space of the attic. These heaters are particularly helpful in limited areas simply because they remain flush from the wall and baseboard region. Moreover, these heaters are usually fixed to the base Board or wall with screws; they’re risk-free from any suggestion overs that will cause a fire-hazard.

Space Heaters

When the attic area is mainly utilized for sleeping, somewhat than as a day-time work place, an area heater is a useful addition to warmth the area. An electric area heater established to get a specific comfort temperature and may be positioned anyplace in the area. It needs to be situated a-way from objects, like clothes or curtains. These heaters aren’t intended to heat an area completely; they supply temporary warmth for occasional space use. Users should seem for designs that have a computerized shut-off characteristic and strong bases; any suggestion overs that are accidental trigger the the area heater to turn off instantly to avoid a fireplace.

Considerations

If set in a top temperature, electric heaters will use an important amount of electricity. Residents should keep the heater established a-T a temperature that is comfy, although lower, including at 7 levels Fahrenheit. When it’s in use moreover, you also ought to heat the attic location; heating a clear attic space wastes power.

See related

How to Repair Household Appliances

Whether you’re dealing with a broken washing machine or a faulty kettle, learning to repair your own appliances can help you save a ton of money that you would’ve otherwise spent on hiring a professional repairman. Little do most people know that it doesn’t take much to repair the common household Chandler appliance repair that we use on a daily basis, and most require only the use of very simple and inexpensive tools. You’ll also find that sourcing replacement parts is relatively easy and can be done online at reasonable rates. Read on to find out how to fix some of the most common problems that you’re sure to come across with your ovens and other electrical appliance repair Chandler AZ.

No Heat on the Electric Oven

What do you do when your oven doesn’t heat up when you switch it on? A good first step would be to pull out the element back to examine the wires. If you find chipped, frayed or broken wires, then cut away the damaged areas while removing a miniscule amount of the insulation part.

One of the major causes of a faulty electric oven is a burned out element. However, if your oven lights still come on with perhaps lukewarm heat, then you might just need to simply switch on the circuit breaker to solve this problem.

No Heat on the Gas Oven

If your gas oven won’t switch on even after you’ve plugged it in then you might be dealing with a problem with the lighting mechanisms, which are as followed:

1 – Spark Ignition: The click sound that you hear when your oven switches on is caused by the spark ignition, but it is not a common component in the construction of modern gas ovens.

2 – Pilot Lights: The pilot lights are what give the burner its flame to ignite the oven. This component is accessible and easy to spot through the opening of the boiler rawer. Close to the tip is a thermocouple cylinder that when broken, can compromise the functionality of the entire pilot light.

3 – Glow Coil Igniters: Lastly, close to the back of the burner component is a glow coil igniter which glows every time you switch on the oven, thus signaling the burner to alight through the gas valve opening.

You can fix this problem by first removing your oven racks so that you can work freely, followed by the metal burner on the bottom. Take this opportunity to clean out any accumulated dirt inside the holes of the burner. Next, you should loosen the igniter by removing the screws and disconnect the terminals to the old igniter in order to connect a new one, and then safely place the wires again and put the igniter together using the screws you undid earlier.

Gas Dryer Won’t Heat – The Igniter Doesn’t Heat Up

To fix a faulty gas dryer, you can start by unplugging the wires that connect the dryer to the burner assembly and turn the dryer on by plugging it in. Light the tester by pressing its leads into the dual terminal. If that doesn’t work, try the thermofuse by disconnecting the dryer, as well as the two wires that connect to the thermofuse. Fix the multimeter to setting RX-1 while making sure that the leads are on each terminal, and if the dial is still blank then it’s time to replace the thermofuse.

You might also need to lift the burner assembly out, for which you must first switch off the gas valve which is placed close to the burner. Make sure that the multimeter is set to RX-1 and link the two probes with the igniter leads using their tips to get a reading and if you don’t then that means the igniter is no longer functional and will need to be replaced. To replace the igniter, unscrew it and slip the new one in its place before screwing it in place.

Gas Oven Doesn’t Heat – The Igniter Heats Up

If the igniter is heating up while the gas oven is not heating up, you should remove its old coils by unscrewing from the metal cover so that it’s easier to lift it out. Then, insert the new coils by sliding them onto the available metal posts and place the metal cover back on again.

Electric Dryer Won’t Heat

To fix this problem, you need to unplug the dryer first and then disengage the wires of the heating element before testing it with a multimeter. If nothing happens, that means your heating element has malfunctioned and needs to be replaced.

Detach the screws which keep the lint catcher attached to the top and then lift the hood with the help of a stiff putty knife and tilt it up until you see the heating element. Then, get rid of the top bracket and install a new heating element by removing the lid enclosure. Once again detach the four wires that connect it to the machine. Put in the new element in the opposite order, and slowly return the rest of the parts, starting with the top bracket followed by the lid and two screws.

The above repair tips for gas and electric appliance repair Chandler are just an example of how easy and simple it can be to repair the appliances in your home. As you can see, you don’t need elaborate equipment or even that much know-how in order to fix your appliances. Sometimes it only takes willingness and the right guidance to quickly fix seemingly difficult appliance damages.

The best way to Install Coat Hooks on Doors

Finishing touches can go a ways toward creating a new house feel like home. Installing coat hooks in your front door gives a storage function that is hassle-free to you remind one to take your jacket when you depart the house and to keep your entry-way structured. The specific method depends on whether your front-door is hollow or solid, as well as a door that is hollow makes the method a little more more difficult. In either case, though, this task is nothing you-can’t manage.

Measure the width of the door and mark its mid-point lightly. Determine how high-up you want to to hold the coat hook; 4″ in the very top of the door is common, but for those who have particularly high ceilings, a window close to the very top of the door, ornamental molding or other variables to consider, you may want to install yours lower.

Extend your measuring tape in the mark and use it as a straight edge where you want to install the hook to get the the location. Mark the the location with all the pencil.

Hold up the hook and center it. Insert the pencil in the hook through the screw hole or holes and make marks that are new . Set the hook a side and erase the first mark, which you no longer you no longer require.

Rap on the do-or together with your knuckles. Listen to the sound it makes to decide whether it’s hollow or strong. If it’s solid, the hardware that was included with the hook will be used by you; if it’s hollow, you may use hollow-core do-or anchors as an alternative.

Drill pilot holes through every one of the marks for the screws. Use a drillbit one dimension smaller in relation to the diameter of the screws or hollow-core do or anchors you program to install.

Hold the hook set up on the do-or. Use a screw-driver to screw the screws in for those who have a great door. For those who have a do-or that is hollow, thread the hollow-core do-or anchors to the holes.

Tap the hollow-core do or anchors having a hammer before the steel flange is flat contrary to the hook. Use a screwdriver to to show the anchors, which distributes the fat of the hook across a bigger surface and opens the mechanism within the do-or, guarding the plaster.

See related

Learn How to Install Hardwood Flooring

From a beginner’s perspective, flooring Chandler is something that you would leave to experts. There are several challenges that you might not be able to handle on your own. However, there are ways for you to handle hardwood flooring without having to struggle with exorbitant contractor fees. You only need to know the basic techniques for installing different types of floors.

Installation Areas

It’s possible to install a hardwood floor either on grade or above grade, but only for unique subfloors indicated below:

Hardwood Flooring

You can install hardwood floors on radiantly heated units only if you have explicit manufacturer approval and recommendation. Hardwood flooring can be done over vinyl, bamboo, stone, and tiles. Before you install the hardwood floor, however, you must check the integrity of your current floor.

While hardwood flooring looks very good, it is not a good choice for moisture-prone areas, unless you have hardwood floors that are uniquely designed for this.

Concrete Subfloors

Having considered the unique features of flooring Chandler AZ, you have to take extra precaution with concrete. In case you are installing the floor over concrete, the subfloor must have been in place for no less than 30 days. Other than that, make sure you conduct the necessary moisture tests before your subfloor is considered ready for installation.

Wood Subfloors

In the case of wooden subfloors, you will either be using OSB boards or plywood. These are two of the most commonly used options. Two things matter in this scenario. One, the subfloor should be solid and stable, devoid of any movement whatsoever. Two, the subfloor must pass structural integrity tests.

Materials Needed

For hardwood flooring installation, there are certain tools and materials that you will need to make this process a smooth and flawless one.

– Crowbar
– Chalk line
– Broom
– Rubber mallet
– Utility towels and knife
– Tapping block
– Hammer
– Spacers
– Jigsaw
– Electric saw

These are the main things that you will need. However, depending on the type of hardwood you are installing, you might need other specialty tools, materials, and equipment.

Installation Techniques

There are different ways of installing hardwood flooring:

– Glueless installation
– Glue down installation
– Floating engineered installation
– Nail down/Staple installation

Surface preparation is the most important step when installing hardwood floors. You must remove any existing floors. Inspect the moisture levels to make sure that there’s no more than 4% moisture content between the hardwood floor and subfloor.

You must also do a calcium chloride and alkalinity test in case you are working on concrete subfloors. The subfloor must not have bumps and should be level. Any high spots should be graded down before you proceed.

For the best results, the hardwood floor you are installing should have similar features with the subfloor and area where you are installing it.

Make sure you adhere to manufacture’s guidelines throughout the installation process. If there’s any door mold or casings, remove them before you proceed. Even the door should be removed.

Phalaenopsis Orchid Bugs

Orchids, or orchids, are an outstanding option for the beginning grower due to their months-long bloom period and easy care. As a result of increased propagation that is business, they’re probably one of the most of the most cost-effective orchids one of the few that can rebloom under home problems and accessible. Common pests that attack house plants also goal orchids. Just like other crops, prevention is the treatment.

Phalaenopsis Lifestyle

Place moth orchids in an east- . Night temperatures shouldn’t dip below 62 degrees Fahrenheit and day-time temperatures should range from 70 to 80 levels. The crops can summer outside in a place that is shaded. Water them in the morning, utilizing distilled water or rainwater. Don’t allow the plant sit in water, but offer additional humidity by putting it on a saucer full of stones or gravel. Remove dead plant materials quickly, and examine crops frequently for pests, especially.

Aphids

Aphids, which are soft-bodied, pear shaped insects about 1/8th-inch-long, are a frequent pest. that is Phalaenopsis These black or green bugs excrete a sticky sap that grows mildew if not detected early and suck plant juices. By squirting the plant over using a powerful stream of water dispatch them. Repeat every couple of days. To get a severe infestation, spray with insecticidal soap in accordance with label directions. Spray weekly for two months after the original spraying to remove generations.

Scale

Both delicate scale, which is white and cottony, and difficult scale — round bumps on stems and leaves — assault Phalaenopsis orchids. Beneath the protective covering are small, sucking bugs. Use a cotton swab dipped in rubbing alcohol to dislodge rub or scale together with a soft toothbrush or your fingers, with or without. Repeat therapy to eliminate lately hatched bugs. To get a severe infestation, spray the plant with neem oil, that may smother the bugs.

Mealybugs

Mealybugs are about 1/8th-inch-long, oval white bugs with filaments on their their health that give the impact of legs. They can lodge and disguise in potting media and hatch in crevices and under pot trays, not just on crops. Mealybugs using a cotton swab dipped in rubbing alcohol with rubbing alcohol or spray the whole plant, allowing it to dribble to the planting medium and to the bottom. Let stand five minutes, then spray. Insecticidal soaps and oil eliminate mealybugs.

Spider Mites

Spider mites are small pests that usually aren’t detected before the result of the damage appears. As the mites have killed the cells of the area layer leaves seem silvery or stippled. They spin webs. Wipe a cloth over either side of a leaf in the event that you suspect mites. If mites are existing, the fabric will be dirtied by brown or red streaks. Humidity is essential to avoiding mites, s O wipe the plant and boost the humidity in the location that is developing. Mites are killed by a spray of rubbing alcohol blended with with several drops of dish washing fluid. Repeat weekly for a number of weeks to eliminate pests that are recently hatched.

See related

How To Choose The Best Carpet For Your Bedroom

The flooring in your bedroom is more important than most of us think. When you wake up, flooring is the first thing that your feet will touch and the last thing before you get to bed. There are different materials that are perfect for the bedroom. When you are looking for carpeting options, your options should center around a carpet with a warm underfoot, plush and soft, and more importantly, a soothing feeling.

Consider Environment

Most of carpet cleaning Tuscaloosa are petroleum products. However, there are also renewable carpeting options like jute, wool, and seagrass. If you are an environment-conscious person, you will choose the environment-friendly option.

There are carpets that trap debris and toxins for a long time. These are eventually released into the air. To overcome this problem, you should find a carpet finishing agent that’s not toxic and spray it on the carpet.

Benefits of Bedroom Carpets

-Soundproofing
With the right carpet, you will add a layer of insulation to your bedroom. This provides added protection against ambient noise. Depending on the thickness of the carpet cleaning Tuscaloosa AL, less noise will be transmitted into the bedroom so you can sleep peacefully.
-Softness
For the bedroom, the carpet has to be soft. You want something soft and smooth under your feet when you wake up. This is supposed to provide a soothing sensation all the time.
-Warmth
Stepping on a very cold floor in the morning can spoil your mood. With a good carpet, however, you will not need to worry about this. Irrespective of the weather conditions, the carpet will always be soft and warm.
-Ease of Maintenance
There’s very little traffic in the bedroom. Therefore, the bedroom carpet cleaning Tuscaloosa AL needs to be vacuumed very rarely.

Bedroom Carpet Challenges

-Stains
Most people opt for unique carpets since there’s not much traffic. Depending on the type you choose, you might have to consider special cleaning techniques for your carpet.
-Replacement
Your carpet will actually last a very long time given that the bedroom has very little traffic. However, over the years, signs of wear and tear will be evident, and you will have to replace it.
-Dealing with Snags
If you have a loop pile carpet in the bedroom, snags that are not treated can start unraveling your carpet after a while.
-Cats
If you have a cat or cats in the house, the carpet is usually one of their favorite play areas. If not properly trained, you will always find shreds of your carpet fiber all over the house if your cat was in the bedroom.

Bedroom Carpet Piles

There are two types of carpet piles; uncut and cut. For uncut carpet piles, fabric loops are threaded through matting, creating the surface fibers in the process. In case the entire loop is not cut, this is referred to as a Berber pile or loop pile carpet.

Cut carpet piles are made when the loop is cut. The result is individual strands which compose the plush carpet surface. Different textures can be created for your carpet, depending on the design, angle, and uniqueness of the cut.

The best way to Paint a Door

There is a time benefit to leaving a door overtaking it down when you want to paint it, hanging in the body. Also, it is off the floor, and also you will paint both edges and sides in the same time that is same. You will need to prop the door open for for a long period period if you are using oil paint, nevertheless. You run the chance of acquiring sags and drips in your paint-job in the event the door is vertical. You get results that are better by laying it flat and getting it down. Doing so enables brush marks to level out.

Tap out the hinge pins using a hammer and screwdriver and take down the door. Remove the hinges, door knob, any and dead-bolt other components on the door using a screwdriver.

Lay the door on a pair of saw-horses in a guarded location. Cover any windows with masking paper and masking tape.

Scrape off any loose paint using a paint scraper. Fill holes and gouges with wood putty. When the putty is dry, sand both sides of the door using a palm sander and 120-grit sandpaper to smooth the complete that is current and prepare it.

One side of the door and all edges with oil-based primer. In the event the door is unfinished, this can be especially important, but the primer aids adhesion of paint, if it’s a complete. When the primer is dry, flip over the door and prime the other aspect.

Start at one end of the door and distribute the coat of paint using a natural-bristle brush. Cover A6-inch part by the end of the do-or, load the brush and utilize paint to a region that is un-painted after which stroke it in to a region that currently continues to be painted. Use a straight movements, and elevate the brush off the area by the end of the stroke. Use this way to to paint all edges and the complete surface.

Let the paint dry till it spread a coat in the same manner, if required, and after that is no lengthier tacky. Before you change the do-or up to to paint the other facet subsequent to the next coat, wait for a T least 24 hrs. When you paint the other facet to expel drips that happen when you distribute paint on the area near the edge paint the edges.

Supply the paint a T least 2-4 to 4-8 hrs to remedy before you attach the components, after implementing the ultimate coat and re-hang it. The paint might adhere to the jamb when the do-or is closed, even if it feels hard to the contact, should you not wait that extended.

See related

Varieties of Rabbiteye Blueberries

Rabbiteye blueberries (Vaccinium spp.) are indigenous to the warm and humid south-eastern United States but are adapted to Sunset’s Environment Zones 8, 9 and 14 through 24. Named for the resemblance of the form of the flower scar to the eye of a rabbit, these shrubs have better drought resistance than blueberries and need time. Unlike the usually self- blueberries, although, two types are needed for cross pollination. Select varieties that can thrive in your problems.

Choosing Types

Rabbiteyes behave differently in various climates, therefore it’s essential to consider aspects such as when the fruits will ripen in your region and when certain types will bloom. Like, “Powder Blue” is an older range detailed as a mid-season berry in the south-east, where it originated. University of Oregon scientists B. C. Strik and C. E. It is highly recommended by Finn for home gardens in the north-west as a late-season variety. When “Powder Blue” was incorporated as a berry for late-season harvest in check plots in the Kearney Agricultural Research and Extension Center in California’s San Joaquin Valley, nevertheless, the berries tended to shrivel in the August heat.

Older Types

Although College of Georgia horticulturalists working with breeding rabbiteye types tout the advancements in current introductions, University of California Cooperative Extension personnel Don Merhaut and Kathie Carter suggest an older range, “Climax.” An early-season range in the south-east, “Climax” ripens in June and July to the central California coastline. Its great fall shade in hotter climates is an advantage for home gardeners, notes Jennifer Trehane in her guide, “Blueberries, Cranberries and Other Vacciniums.” For pollination, pair “Climax” with other early-season types.

Recent American Introductions

Of the newer, patented rabbiteye introductions in the U.S. south-east, Drop Creek Nursery, the accredited nationwide distributor, suggests “Vernon” for California gardeners. For big berries in July and August, plant “Vernon” with other early bloomers. Although Drop Creek suggests another current introduction, “Alapaha,” the older range “Climax” should act as a cross-pollinator, as well.

New Zealand Introductions

Blueberry types were released to New Zealand, where several new types have been developed by breeders. Merhaut and Carter suggest a 1990 New Zealand introduction, “Maru,” for berries in July and August. Another 1990 Newzealand introduction, “Rahi,” fared nicely in the KARE Middle late-time trials. These two huge-berried kinds could be planted together for crosspollination.

See related